
Simple Single Sign-On Part 1 - (Open)LDAP
Individual user and password databases for every single service in a network are a nuisance for users and for admins, especially when users have a tendency of forgotting their password. Using LDAP for a centralized user management is less complicated than you might think. Even in a SOHO (Small Office/Home Office) environment LDAP is not overkill. Setting it up will pay out in little time.

Using LDAP as a user and group database is supported by all Unix variants for ages. However, documentation is often sparse, incorrect, or outdated. Additionally, it mostly covers just one aspect and not the system as a whole.
This series of documents will give you a complete walk-through for setting up a a server with SSHD, Mail (Postfix), IMAP (Dovecot) and File Sharing (Samba) with OpenLDAP and the System Security Services Daemon sssd on a recent Linux system. I used Gentoo Linux but you won't have problems using any other Linux distribution.
It is assumed that all services are already set up but are not prepared for LDAP yet and that you are the owner of "Example Ltd." that has registered the domain "example.com".
What is Single Sign-On
Single sign-on means that a user --- after logging in once --- is automatically authenticated for all local services without entering credentials. The setup described here is something different, rather a centralized management for user and group data, especially passwords. The title of this document is, umh, ..., actually a marketing lie.
On the other hand, real single sign-on becomes less and less important in an environment where users use a multitude of services from a multitude of devices. Single sign-on saves you from logging into mail, file sharing, web applications, and so on separately. But you still have to log in separately with your computer, your tablet, your phone, your wearable, ...
Why LDAP?
LDAP is notorious for being bloated, complicated, and not very nicely documented and I quite frankly think that it deserves this reputation. Honestly, a relational database could serve just as good as a backend for the management of user and group data.
A major disadvantage of LDAP is the absence of referential integrity checks in the default configuration. With OpenLDAP you have the option to configure this (see the manpage slapo-refint(5)). Foreign keys as supported by almost all relational database management systems on the other hand are easy to understand and implement.
Nevertheless, LDAP is the only established data backend for user and group data, mostly because it is just a protocol, independent of the concrete implementation. It just required an agreement on appropriate schemas that can --- at least theoretically --- be easily extended and modified for the needs of the own organization.
Theoretically, you can use a multitude of LDAP implementations. I will only cover OpenLDAP here.
Setting Up OpenLDAP
First, you have to install OpenLDAP with emerge, yum, apt-get or whatever package manager you are using. Depending on your vendor, the package that you install is either "openldap", "openldap-server", "slapd" or similar.
The next step is to configure OpenLDAP. The configuration file is almost always /etc/openldap/slapd.conf. Mine looks like this:
include         /etc/openldap/schema/core.schema
include         /etc/openldap/schema/cosine.schema
include         /etc/openldap/schema/inetorgperson.schema
include         /etc/openldap/schema/nis.schema
include         /etc/openldap/schema/misc.schema

pidfile         /run/openldap/slapd.pid
argsfile        /run/openldap/slapd.args

database        hdb
suffix          "dc=example,dc=com"
rootdn          "cn=Manager,dc=example,dc=com"
rootpw          "{SSHA}Vd6dXmLTKLn3ibXSTxfmVfY4t6mW5FZw"
checkpoint      32      30

directory       /var/lib/openldap-data

index   objectClass     eq
Let's go through this minimal configuration.
Lines 1-5 include the necessary LDAP schemas that we need for the user and group database.
Lines 7 and 8 may have to be changed on your system. For example CentOS uses /var/run/openldap instead of /run/openldap. Check out the default configuration for your system or try find / -type d -name openldap.
In line 10 we select "hdb" as the database backend which is sufficient for small environments.
Lines 11 and 12 have to be modified for the domain name that you are using. The name "Manager" in line 12 is actually arbitrary. Most people seem to use "Manager" though.
The password in line 13 can be created with the tool "slappasswd":
# slappasswd
New password:
Re-enter new password:
{SSHA}Vd6dXmLTKLn3ibXSTxfmVfY4t6mW5FZw
Do not forget to put double quotes around the password hash in the config file. Alternatively, you can just use a plain-text password like this:
rootpw "secret"You should only do that, though, when read access to the file is appropriately restricted.
The path to the ldap data directory in line 16 may also have to be changed on your system. Other common choices for the directory are /var/lib/ldap or /var/openldap-data. The directory should have the permissions 0700 and be owned by the user running the ldap server, most of the time "ldap".
The "checkpoint" directive configures the database checkpointing. "32 30" means that a checkpoint is created after 32 kB of data being written or after 30 minutes, whatever occurs first. See http://www.zytrax.com/books/ldap/ch6/bdb.html#checkpoint for a better explanation.
Now we can start the LDAP server. Note that the name of the service is usually "slapd" (and not "openldap" or "ldap"):
# /etc/init.d/slapd start
 * /var/lib/openldap-data/DB_CONFIG does not exist, slapd performance may be sub-optimal
 config file testing succeeded
  * Starting ldap-server ...                                               [ ok ]
Everything worked fine except for an ugly warning about a missing database configuration file. OpenLDAP usually ships with a DB_CONFIG.example. If you cannot find it, use this version:
# cat /var/lib/openldap-data/DB_CONFIG
# $OpenLDAP$
# Example DB_CONFIG file for use with slapd(8) BDB/HDB databases.
#
# See the Oracle Berkeley DB documentation
#   <http://www.oracle.com/technology/documentation/berkeley-db/db/ref/env/db_config.html>
# for detail description of DB_CONFIG syntax and semantics.
#
# Hints can also be found in the OpenLDAP Software FAQ
#   <http://www.openldap.org/faq/index.cgi?file=2>
# in particular:
#   <http://www.openldap.org/faq/index.cgi?file=1075>

# Note: most DB_CONFIG settings will take effect only upon rebuilding
# the DB environment.

# one 0.25 GB cache
set_cachesize 0 268435456 1

# Data Directory
#set_data_dir db

# Transaction Log settings
set_lg_regionmax 262144
set_lg_bsize 2097152
#set_lg_dir logs

# Note: special DB_CONFIG flags are no longer needed for "quick"
# slapadd(8) or slapindex(8) access (see their -q option).
Copy the file as DB_CONFIG into the data directory and the warning should go away.
Using systemd
If you are using systemd you have to start the server like this:
systemctl start slapdEnabling TLS/SSL
All communication with the LDAP server is currently unencrypted and for the rest of this tutorial this will not change for the sake of simplicity.
For a home server this may be acceptable but for anything else this should be addressed by enabling TLS/SSL. The minimal setup for this in /etc/openldap/slapd.conf looks like this:
TLSCipherSuite normal
TLSCACertificateFile  /etc/openldap/certs/ldap.example.com.crt
TLSCertificateFile    /etc/openldap/certs/ldap.example.com.pem
TLSCertificateKeyFile /etc/openldap/certs/ldap.example.com.key
TLSVerifyClient never
Of course, you have to create these files but a search for "openssl tutorial" will bring up tons of documentation for that. Once your OpenLDAP server is secured, replace port number 389 with port 636 and the scheme "ldap://" with "ldaps://" wherever you come accross it.
Dynamic slapd Configuration
Many tutorials tell you to convert your configuration file to something called "dynamic configuration". It basically works by creating ldif files that are then added to the configuration of a running server with the commands "ldapadd" and "ldapmodify". Well, you rather want to shoot yourself in the head than getting your hands dirty with that stuff. Stick with the human-readable config file described above unless you find a reason for switching to the complicated variant.
Replication, Permissions, ...
You will also find a lot of advice about setting up replication with a second server, fine-grained permissions for changing the data stored in LDAP, and other esoteric stuff. All that is in general not needed.
Populating LDAP
Creating the Base Entry
The database ("directory" in LDAP lingo) is currently empty. The "recommended" way of populating it is to use "ldapadd/ldapmodify" and ldif files. We will use a GUI tool instead except for the base entry of the directory that has to be created manually. First create a file base.ldif:
dn: dc=example,dc=com
objectclass: organization
objectClass: dcObject
o: Example Ltd.
The first and the last line have to be changed, of course. When ready, you can add the base entry on the command line with "ldapadd":
$ ldapadd -x -D "cn=Manager,dc=example,dc=com" -W -f base.ldif
Enter LDAP Password: secret
adding new entry "dc=example,dc=com"
Again, make sure that you change "example" to match your domain name. The password is the "rootpw" from slapd.conf.
JXplorer
I usually prefer command line tools over graphical user interfaces. And true, using "ldapadd" and "ldapmodify" for managing the database is fine, when you automate things. For the casual user these tools are pretty cumbersome, and the GUI tools save you a lot of typing and are less error-prone.
There are a number of LDAP frontends (LDAP "browsers") available. I use JXplorer. It is ugly and slow because it is written in Java but otherwise does its job, it is free (as in beer only) and platform-independent.
The JXplorer site has instructions for installing and starting JXPporer.
Fire up JXplorer and then go to File -> Connect or use the leftmost icon in the toolbar:

The hostname of the LDAP server can be specified as an IP address or name. The base DN and user DN are the ones that you had configured in slapd.conf and the password is the manager password that you had created with slappasswd.
Wait a second! Do not click "OK"! First click "Save" and give some meaningful name to your configuration. The next time you can select the same configuration with the select box next to the "Save" button.
After a successful connection you see the current contents of the directory which just contains the base entry:
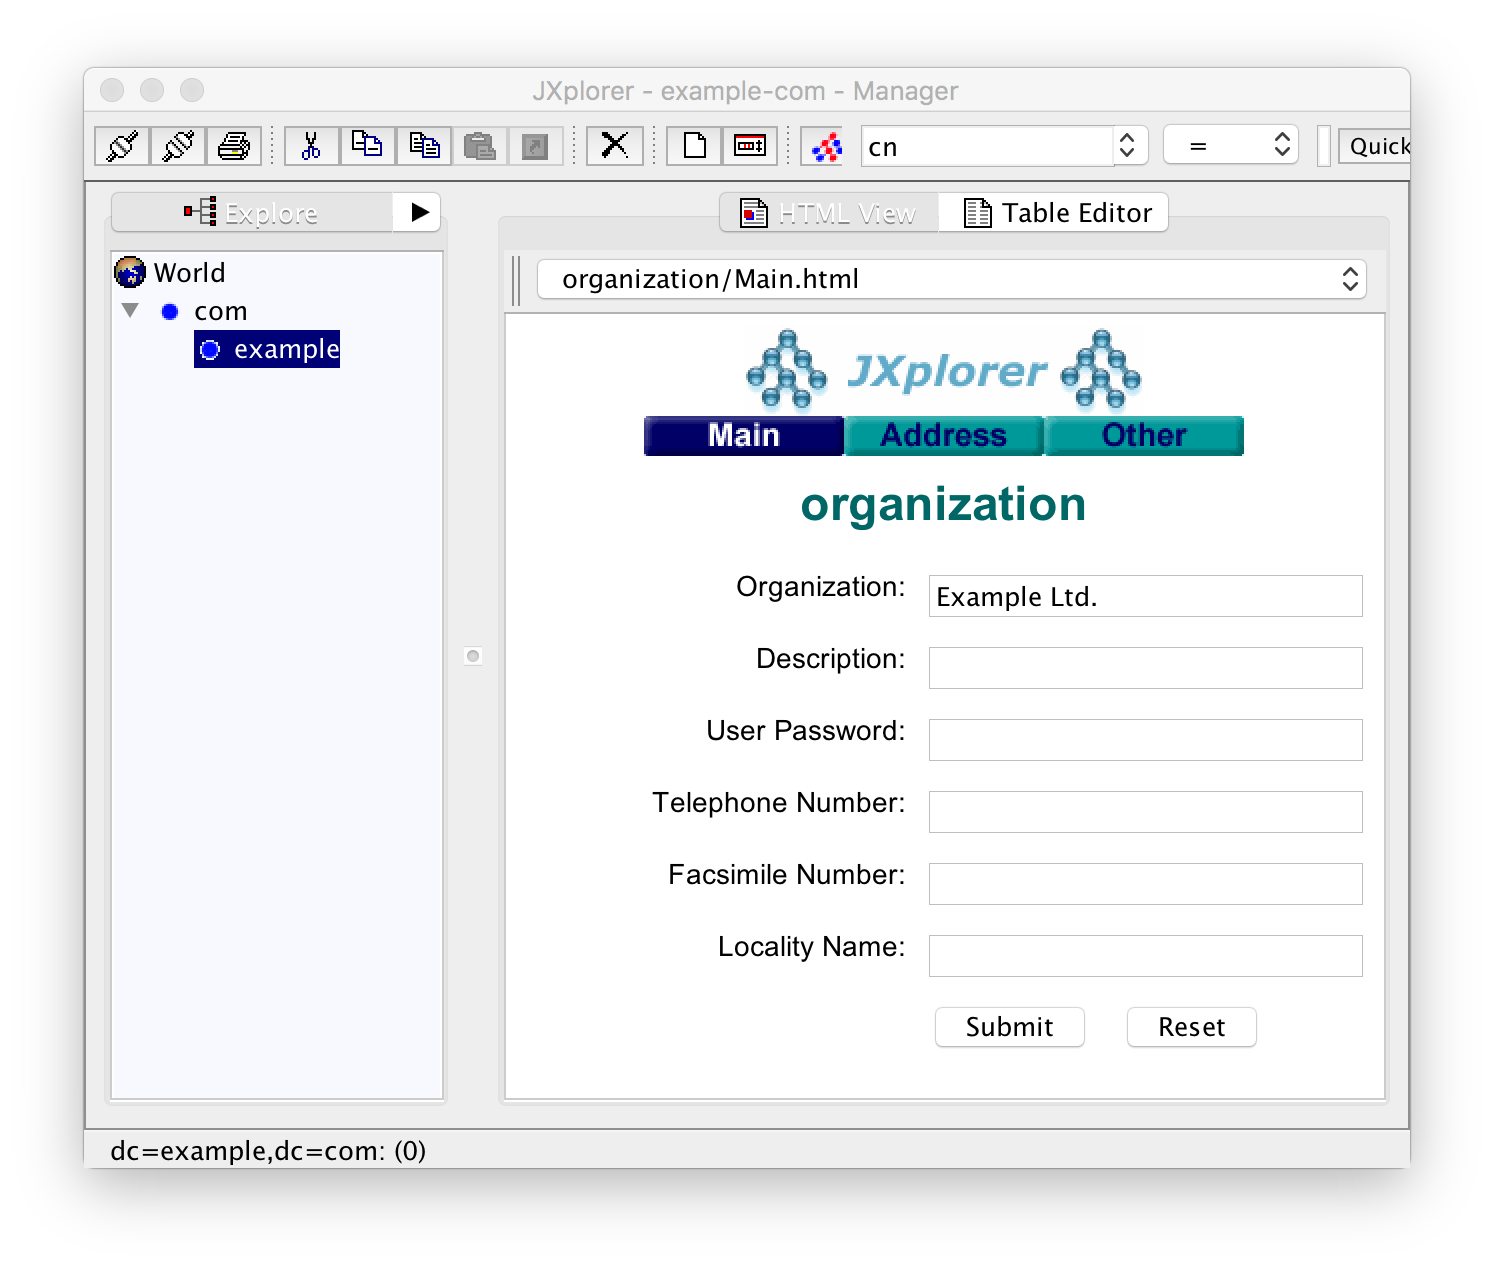
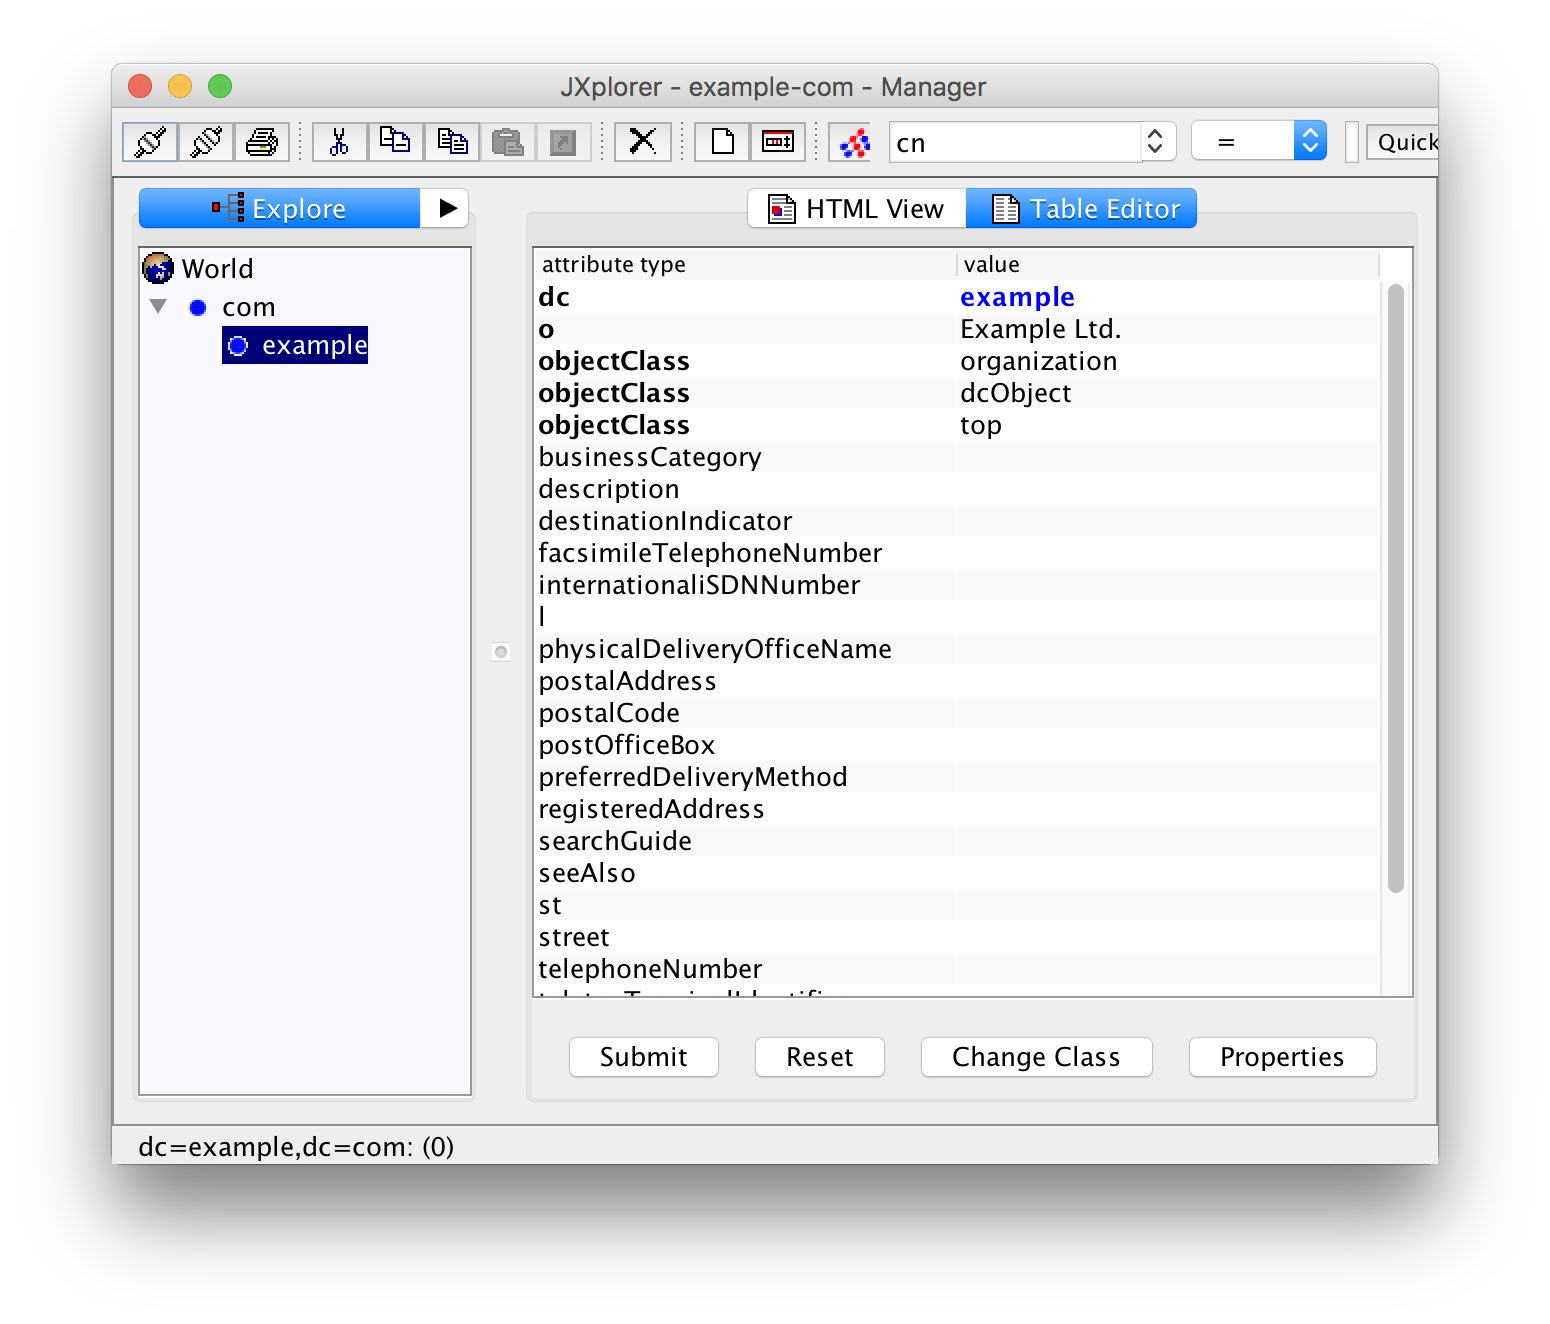
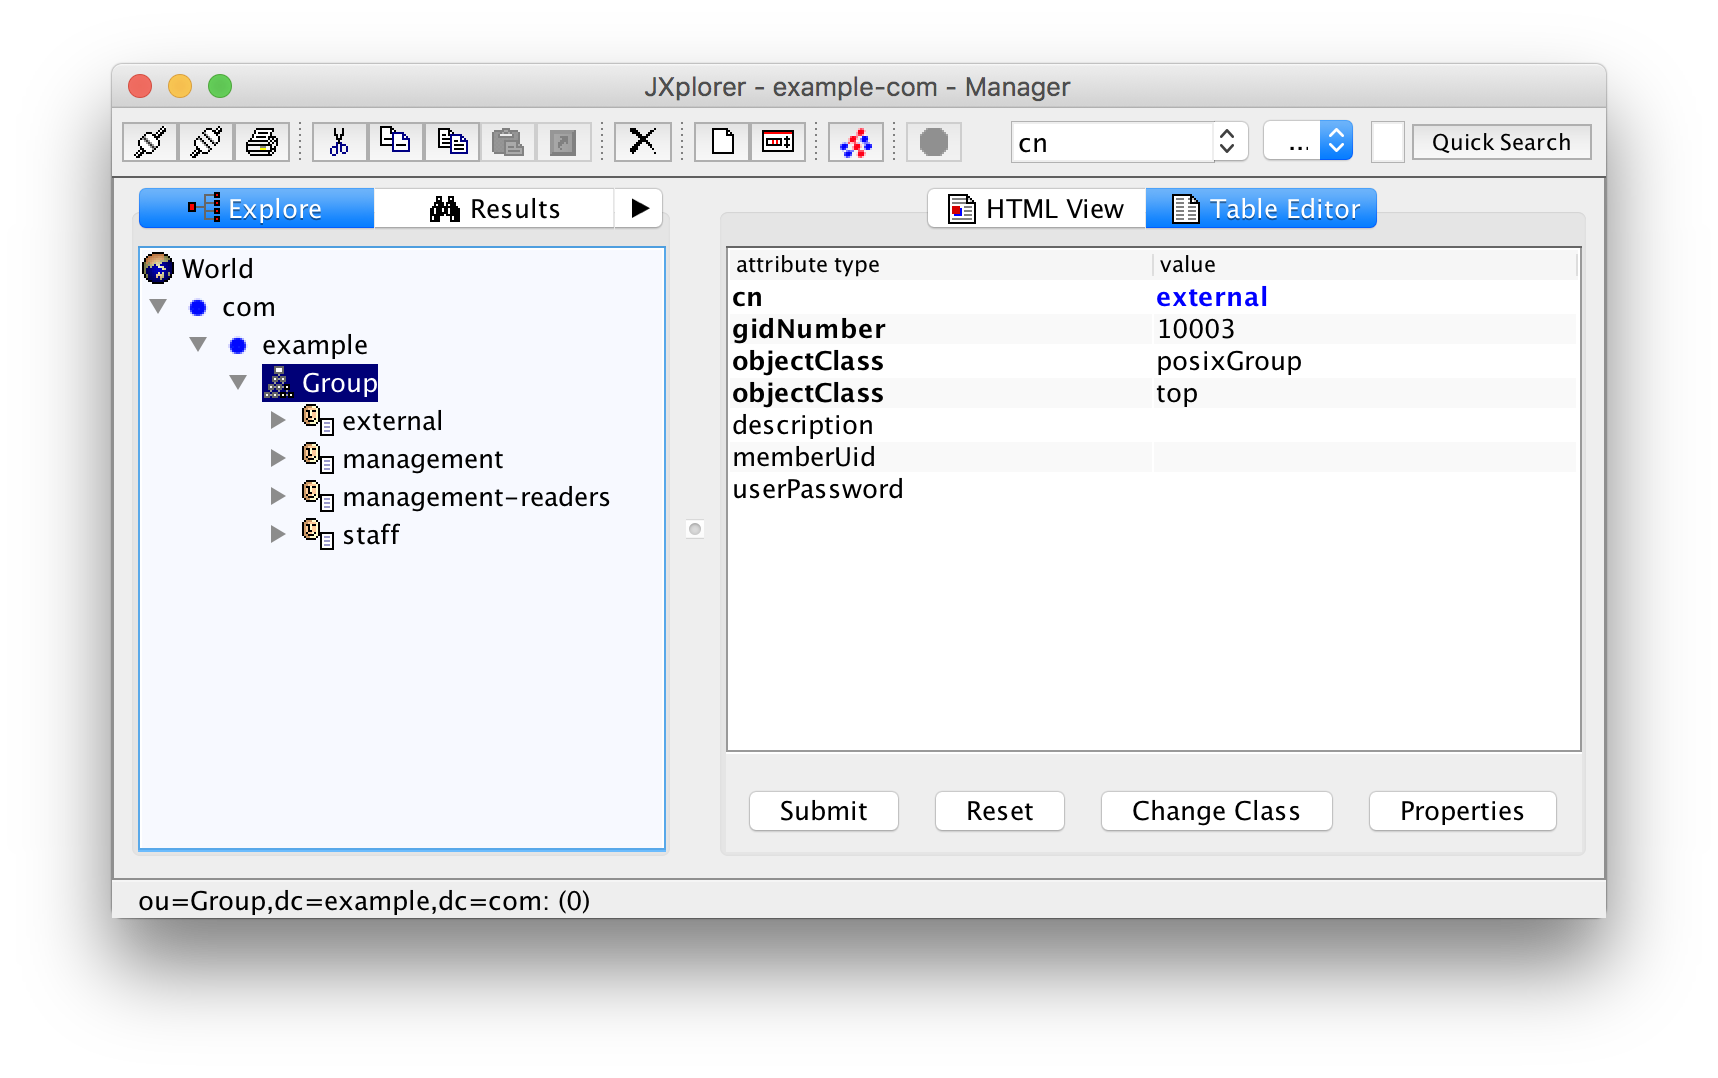
In the left pane, you see the current tree. The right pane contains a form with the data, currently just the name of the organization. What you see is the "HTML View" of the entry. Click on "Table Editor" in order to see the table view:
Creating Groups
Linux allows mixing users and groups from the file system and from LDAP. Therefore it is not strictly necessary that you create groups in LDAP. I recommend that you keep all the system users (root, daemon, postfix, ...) and groups (root, wheel, audio, video, ...) in the file system and use LDAP for the humans.
Before you can create groups, you have to create a container for them. Right-Click on "example" (or whatever your domain name is) in the left pane and then add this container (with "New"):

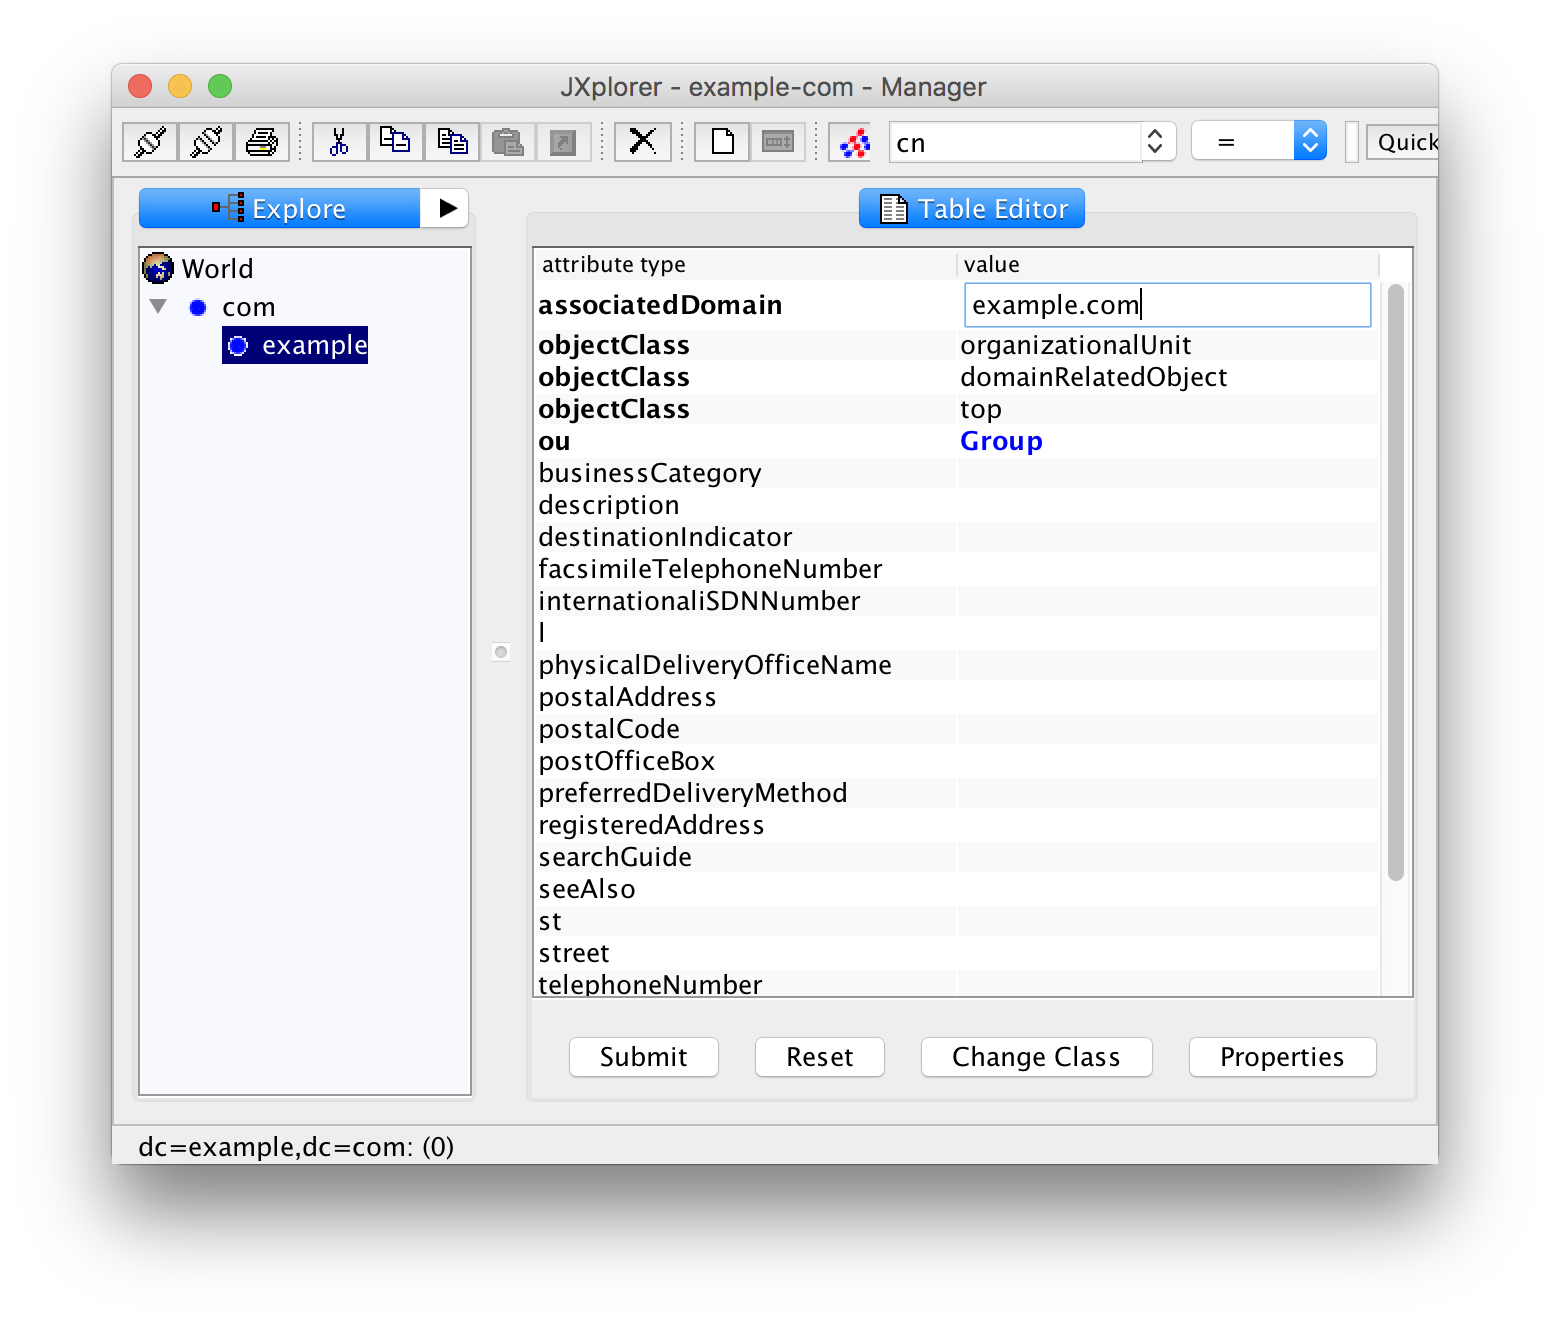
The RDN (relative distinguished name) should exactly be "ou=Group". Select the three classes "organizationalUnit", "domainRelatedObject" and "top" under "Available classes" and click "Add". The class "top" will be added automatically and can be omitted. A click on "OK" will create the entry.
But you are not yet done! In the right table you will see that the mandatory field "associatedDomain" is empty. Mandatory fields are bold. Fill in your domain name:
Now click "Submit". You now see a triangle next to the base entry in the left pane. Click it to expand the entry so that you can see the new entry "Group".
Before you start creating a group, you should think about the numerical group and user ids you want to use. Linux can mix users and groups from the file system and LDAP but I suggest to keep it simple. Try to avoid conflicts or confusion and use numerical ids that are unlikely to be used by the conventional file system based tools.
I use ids starting with 10000 for LDAP and reserve the lower ones for the conventional stuff.
So let's create a group "staff" (or "family"). Right-click on "Group" in the left pane, and add it with "New":
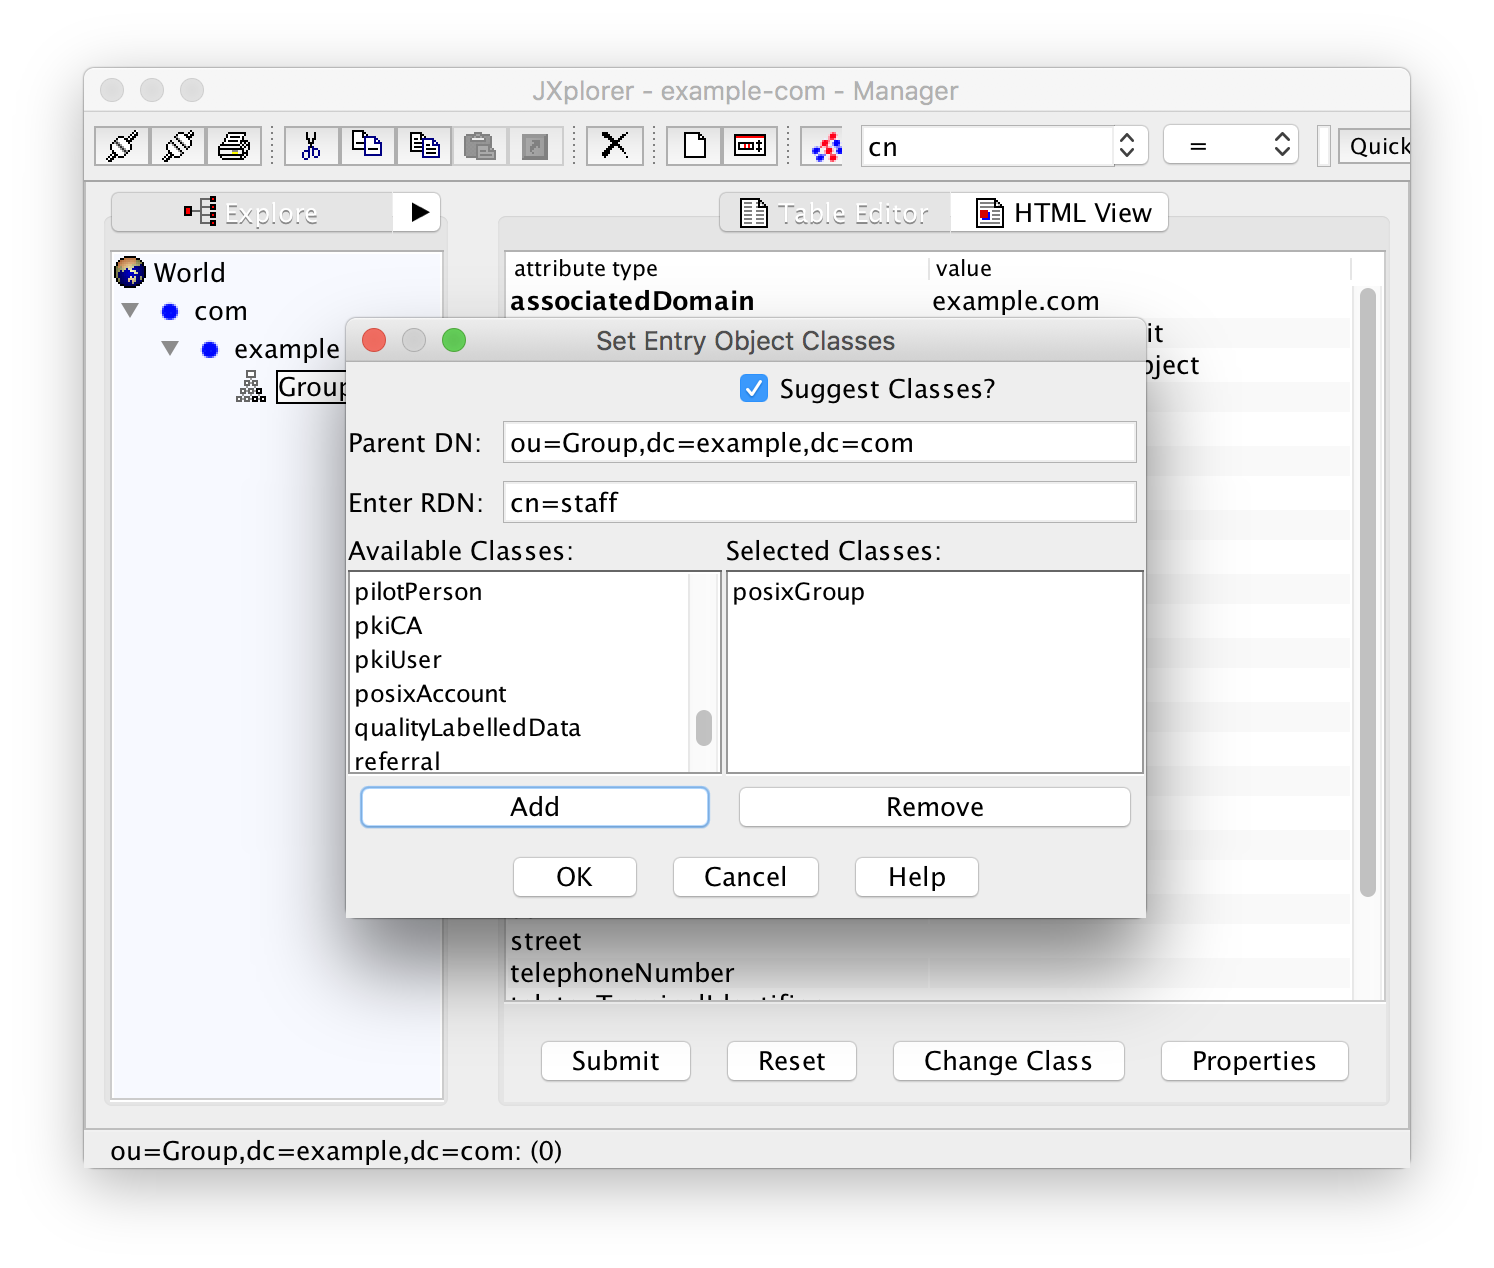
Fill in the RDN "cn=staff" and select the class "posixGroup". Click "OK" and then fill in the gidNumber 10000 before submitting the data. If you forget to add a gidNumber you will get an error message "Unable to perform Modify operation".
In the same manner create a group "management" with the gid 10001 for users that are allowed to read and write classified documents. Add a group "management-readers" (GID 10002) for those users that are only allowed to read such documents. And finally a group "external" (GID 10003) for external users with limited privileges.
Unfortunately, the groups are ordered by their name (cn or common name) and not by the numerical group id (which is just an arbitrary attribute for LDAP). To make things worse, you can happily create as many groups as you want with the same group id. This is not a bug or a shortcoming of the system. Group or user duplicates are a feature of Unix that can also be used with /etc/passwd and /etc/group.
This may not be a big deal with groups but can cause you headaches with users since you normally have a lot more users than groups. You either have to count the user ids or keep track of the last id used.
Another solution is to query the LDAP server for the GIDs already in use:
$ ldapsearch -h localhost -b dc=example,dc=com -S gidNumber objectClass=posixGroup | grep ^gidNumber
gidNumber: 10000
gidNumber: 10001
gidNumber: 10002
gidNumber: 10003
Change the options "-h localhost" for the hostname and "-b dc=example,dc=com" according to your local environment.
Creating Users
Just as with groups, you have to create a container for the users. This container is conventionally called "People". Right-click the base entry ("example" for our example) in JXplorer and add a new entry with "New":
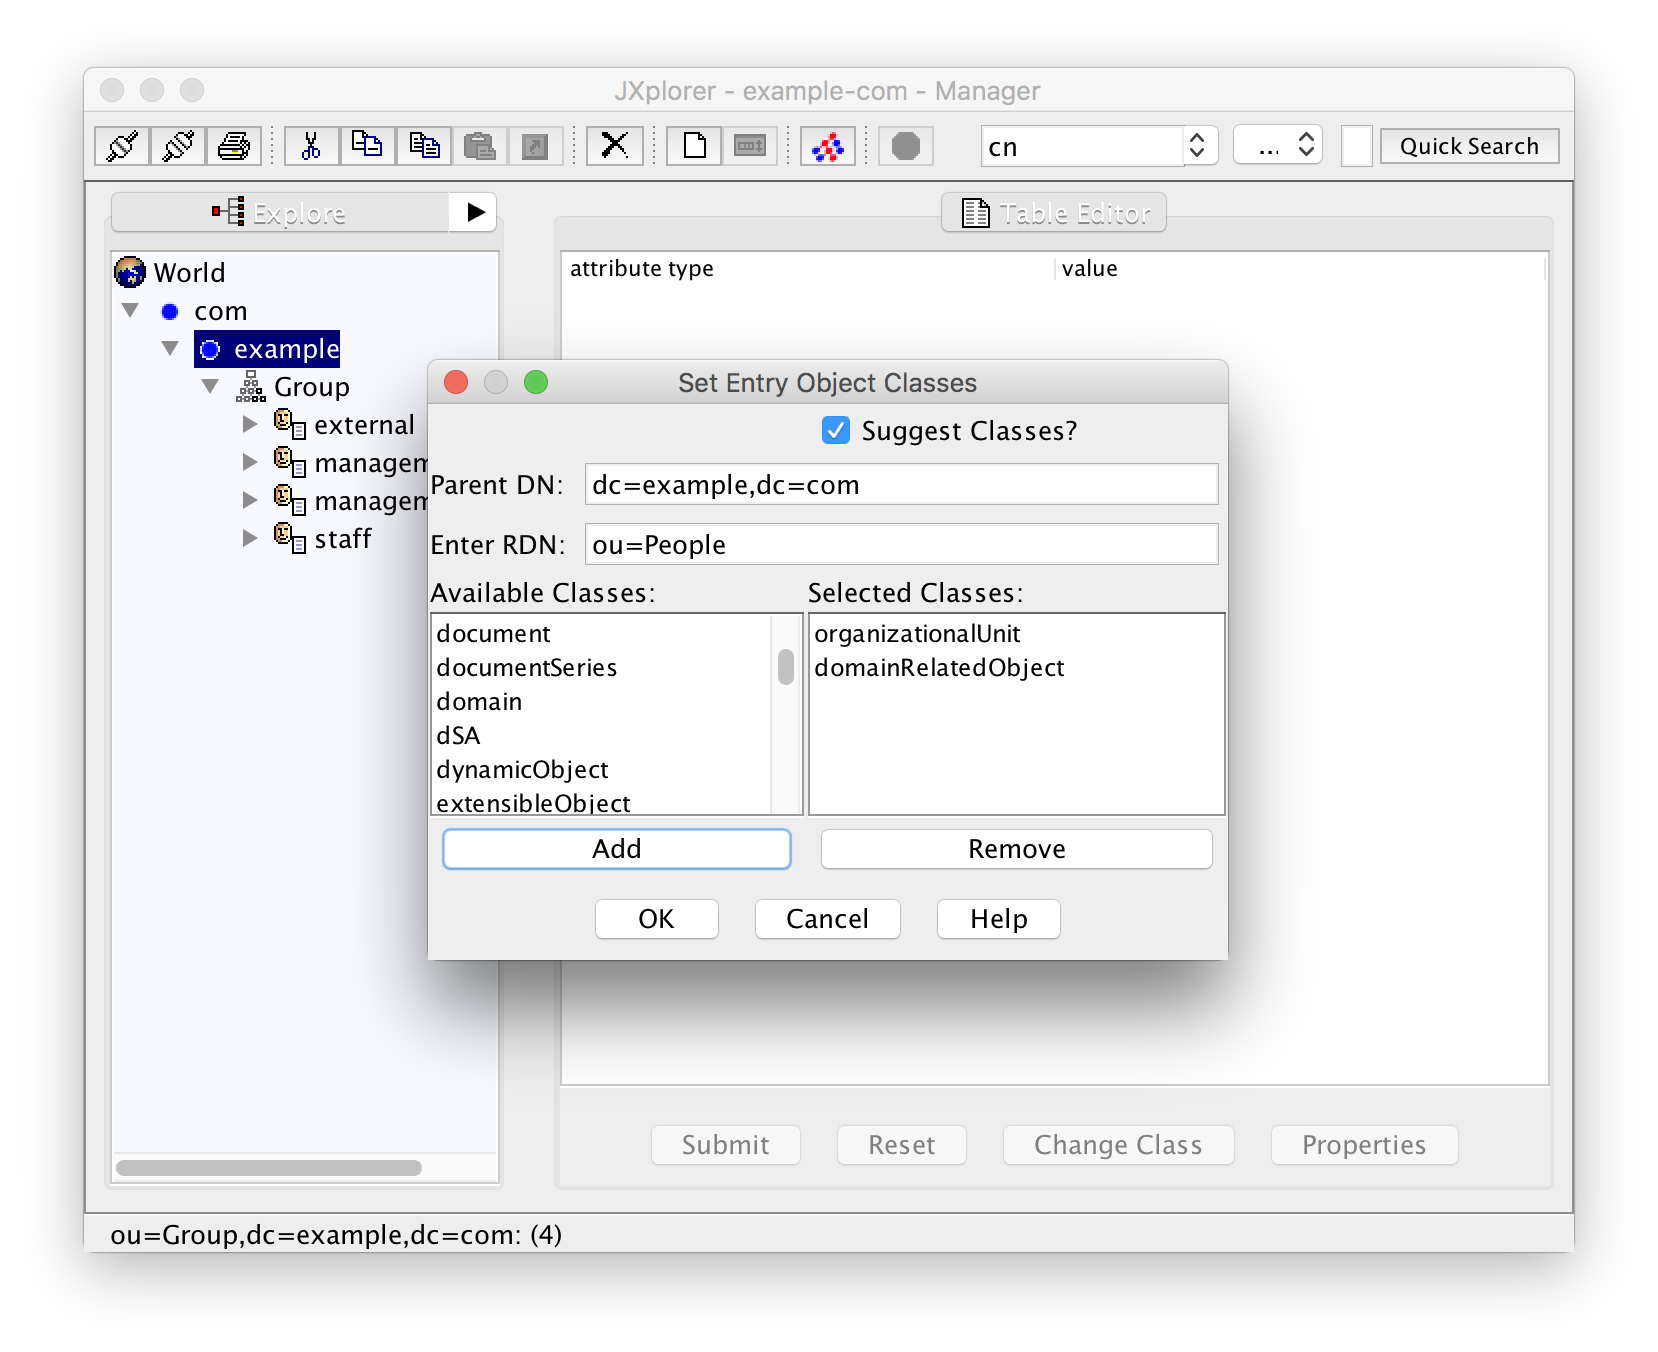
Create the entry with "OK", add "example.com" (or your domain ...) for the missing mandatory attribute associatedDomain, and save with "Submit".
And again, just as with the groups above, you should take a second and think about a numbering scheme for users. I recommend using UIDs starting with 10000 for LDAP so that you can clearly distinguish between system users and humans.
For anything but a family or home server you will probably also have to think about a naming scheme for your users. One popular choice is "firstname.lastname". I will use "flastname" for this example. Let's create the first user Juliet Boss by right-clicking on the container "People" and selecting "New":

The RDN for the user is "uid=jboss" because we chose the naming scheme "flastname".
Select the classes "organizationalPerson", "inetLocalMailRecipient", "posixAccount", and "shadowAccount". The classes "person" and "top" are implicit and are added automatically.
After creating the user with a click on "OK" you can see that the mandatory (bold) attributes "cn", "gidNumber", "homeDirectory", "sn", and "uidNumber" are still empty. They have to be filled now:
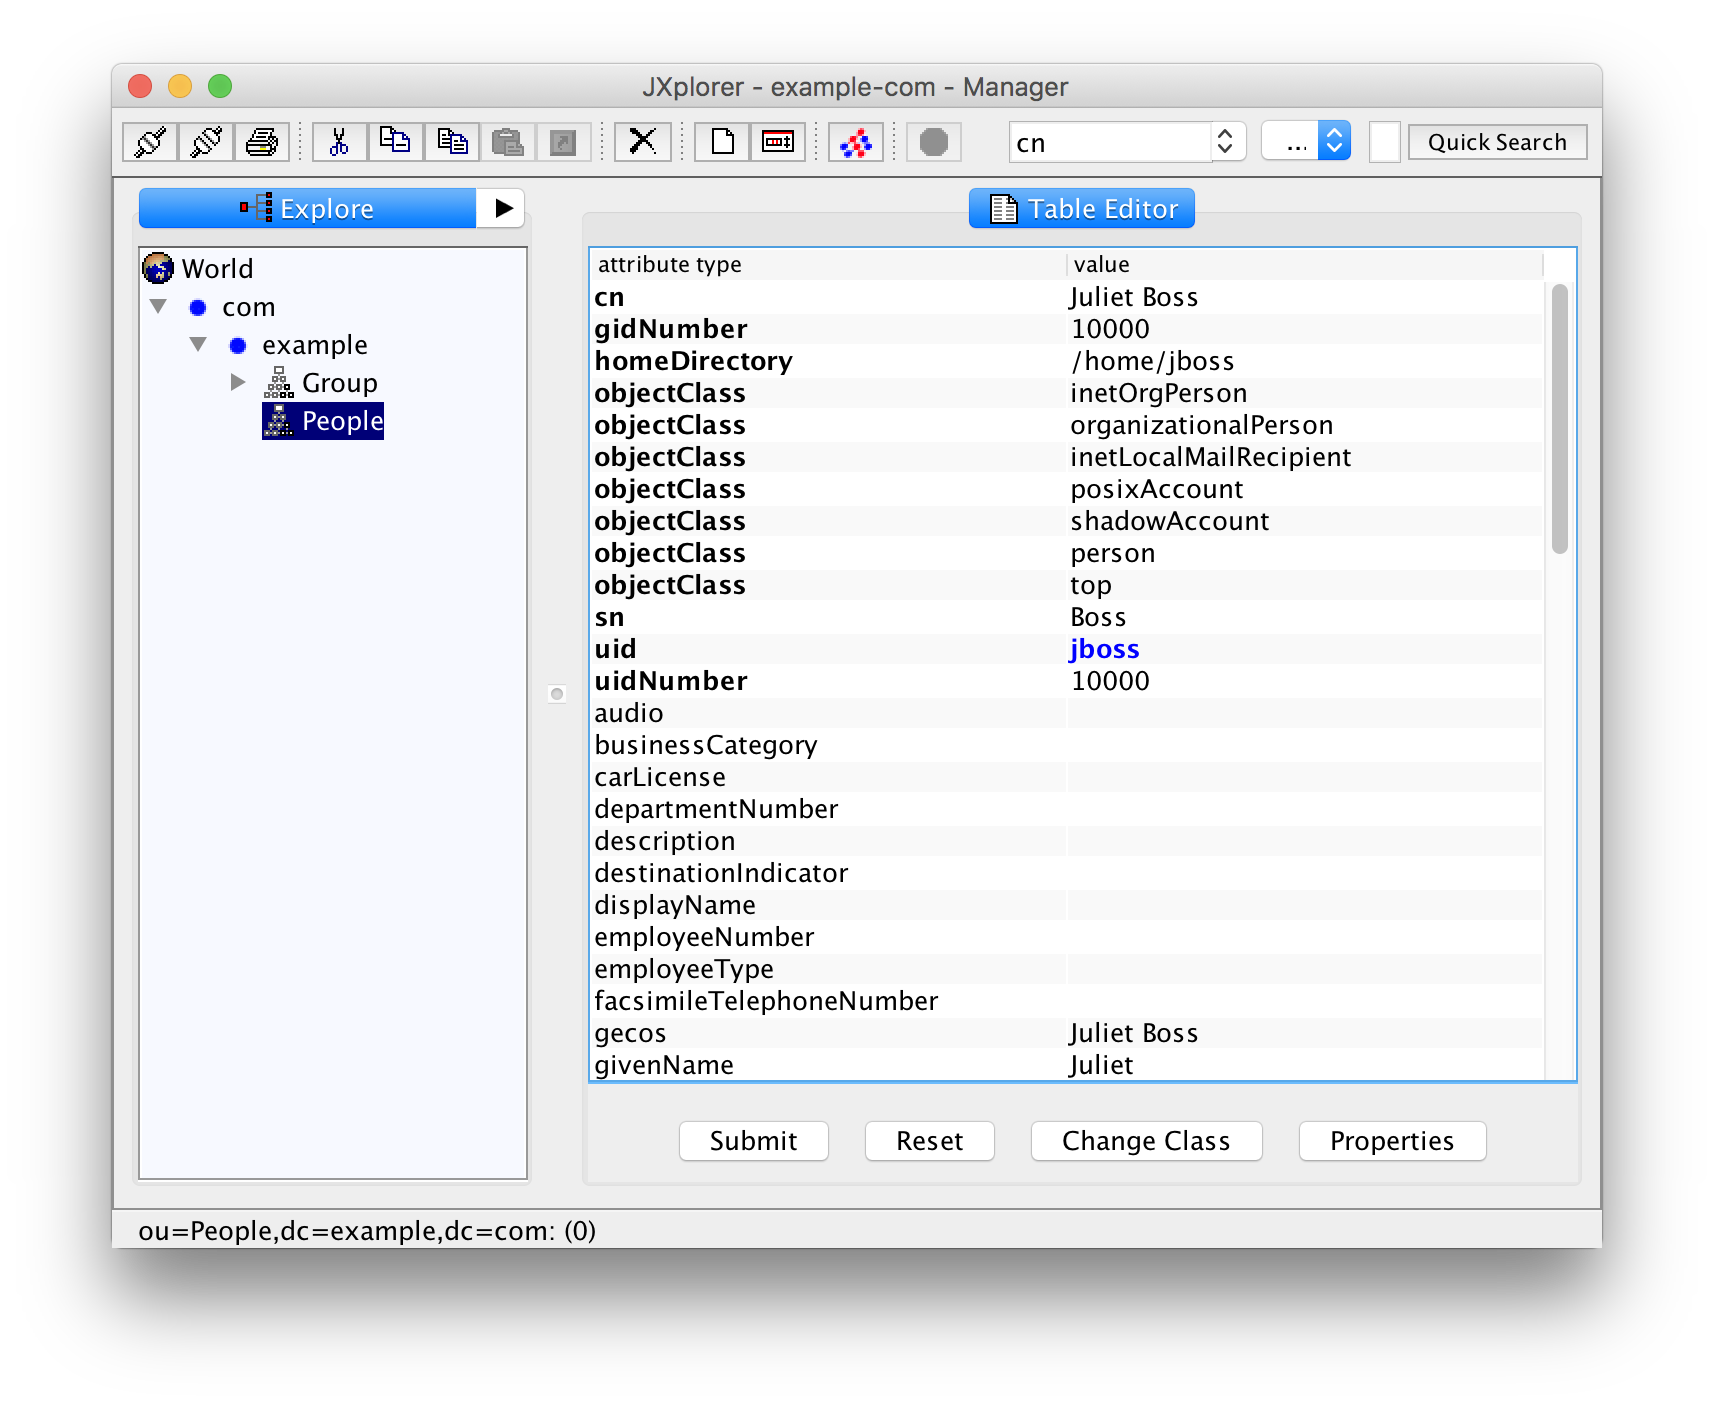
The attribute "cn" holds the "common name", normally the full, human-readable name of the person.
The "gidNumber" holds the numerical id of the primary group of the user. Fill in 10000, the group id of "staff".
The name of the home directory is usually the user id ("jboss") inside the directory "/home" but your mileage may vary.
For "uidNumber" we take 10000. The attribute "sn" stands for surname, in our case this is "Boss".
You can also fill the non-mandatory attributes "givenName", "mail" for the mail address, and so on. The field "gecos" will usually have the same value as the "cn" attribute. Whether "cn" or "gecos" takes precedence, when later querying the user data with getpwent(3), getpwnam(3), getpwuid(3), or getpwuuid(3) is left as an exercise to the interested reader.
One non-mandatory field that you definitely want to fill is "userPassword". In JXplorer this will pop up a dialog that lets you enter the password as plaintext.
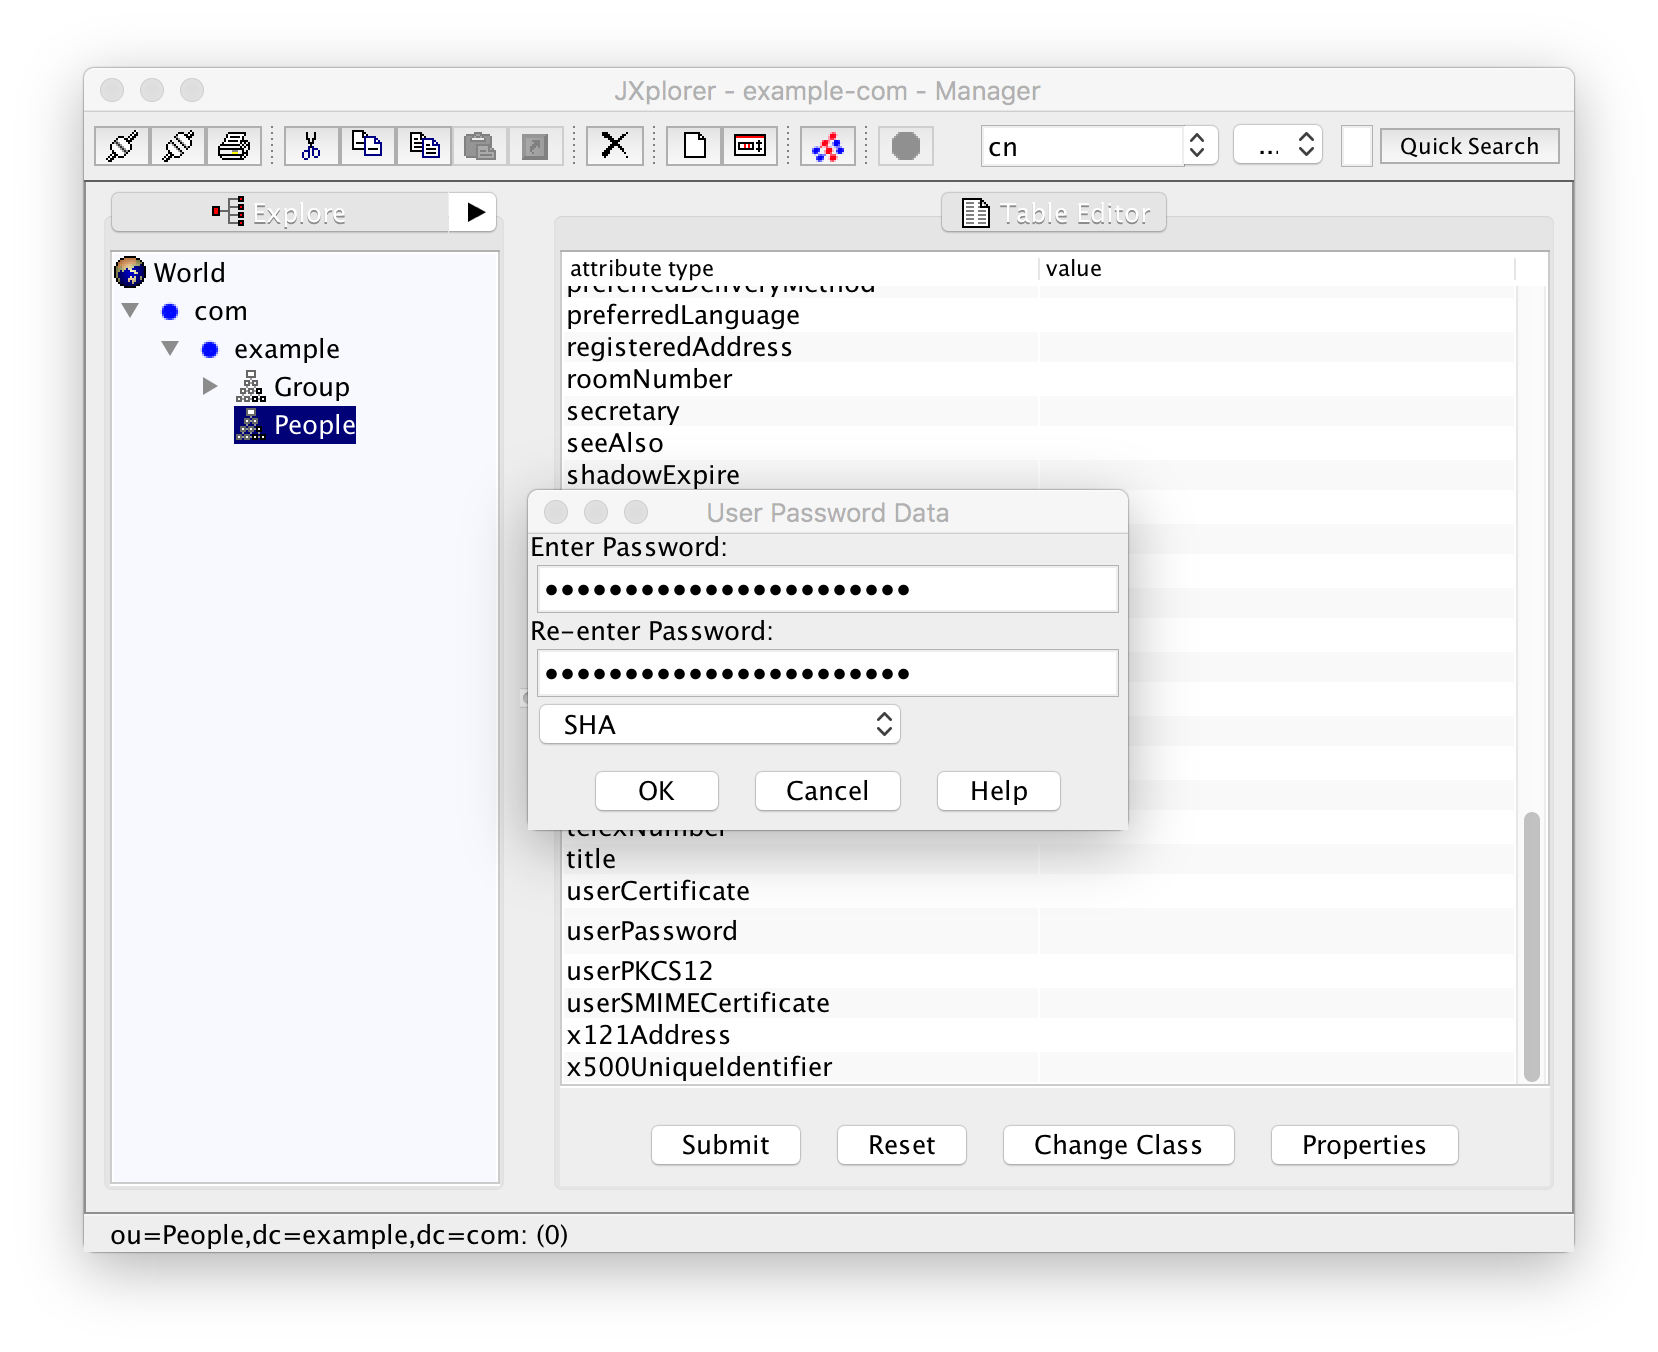
You can, however, choose an encryption scheme --- one of "verify", "plain", "MD5", "SMD5", "SHA", and "SSHA". Using the default "SHA", the password will actually be saved as "{SHA}DIGEST" where "DIGEST" stands for the SHA digest of the password you have entered. If you were using the command-line tools "ldapadd/ldapmodify" you had to generate that digest with "slappasswd" instead. With the GUI you can use this standard password dialog instead.
You should also set the attribute "loginShell" to the login shell of the user, for example /bin/sh or /bin/bash (see /etc/shells for a complete list of options).
Once you are done filling in user data, store it with "Submit".
Now create three more users in the same manner:
- Tim Rainee with numerical UID 10001
- Susan Ecretary with numerical UID 10002
- Ferdinand Reelancer with numerical UID 10003
All of them have the primary group number 10000, the group "staff".
But wait! Ferdinand Reelancer is external and not employed by the company. Select his entry in the left pane and change the attribute gidNumber to 10003, the numerical gid of the group "external".
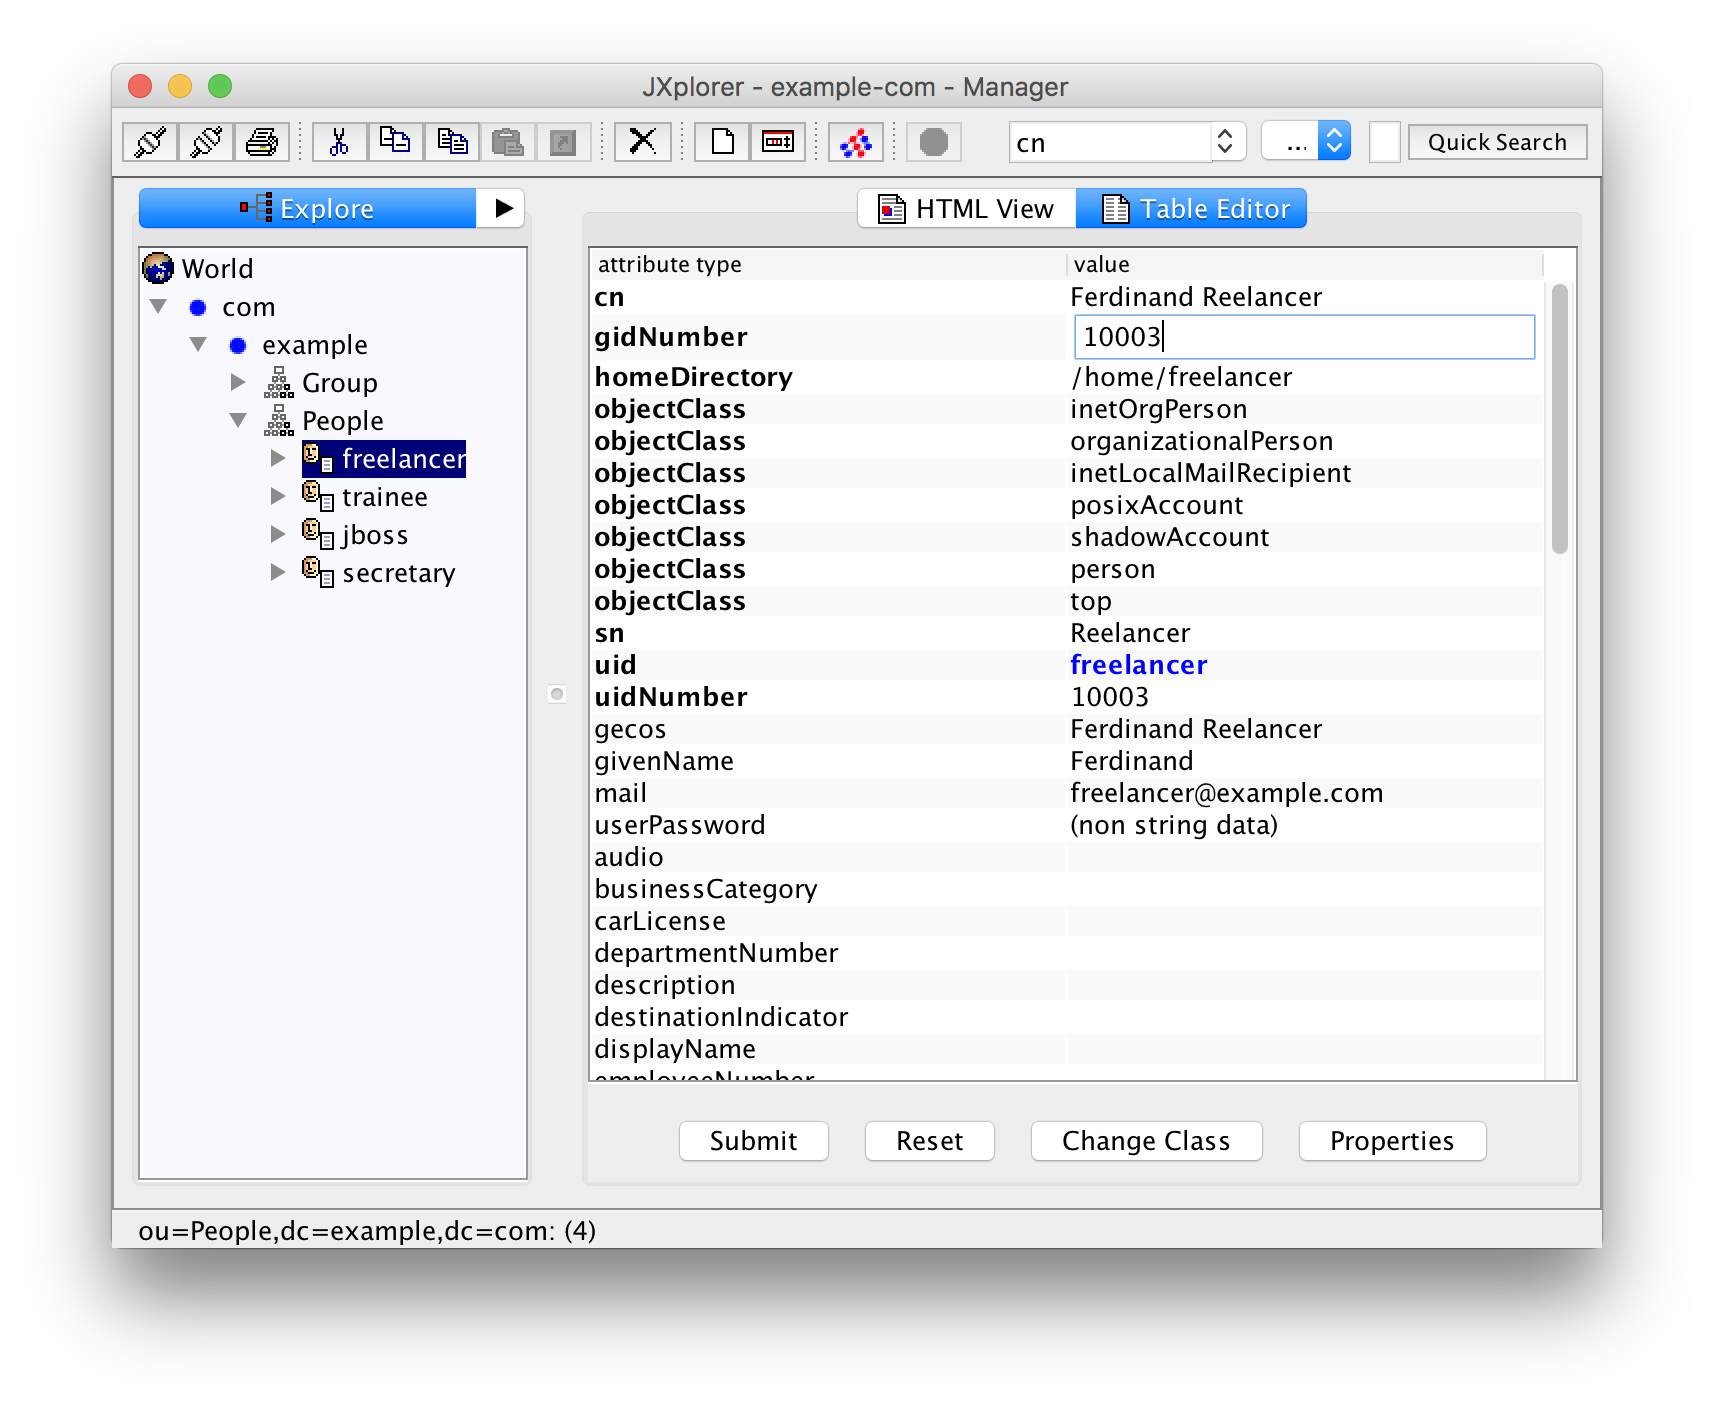
Do not forget to "Submit" your changes!
We have the same problem as with the groups here that we have to remember which numerical UIDs are already in use. You can get an overview with this command:
$ ldapsearch -h localhost -b dc=example,dc=com -S gidNumber objectClass=posixAccount | grep ^uidNumber
uidNumber: 10000
uidNumber: 10001
uidNumber: 10002
uidNumber: 10003
Using JXplorer For Searching
You can also use JXplorer for searching the UIDs that are already used. First, you have to create a so-called "Return Attribute List" from the menu entry Seach -> Return Attributes:
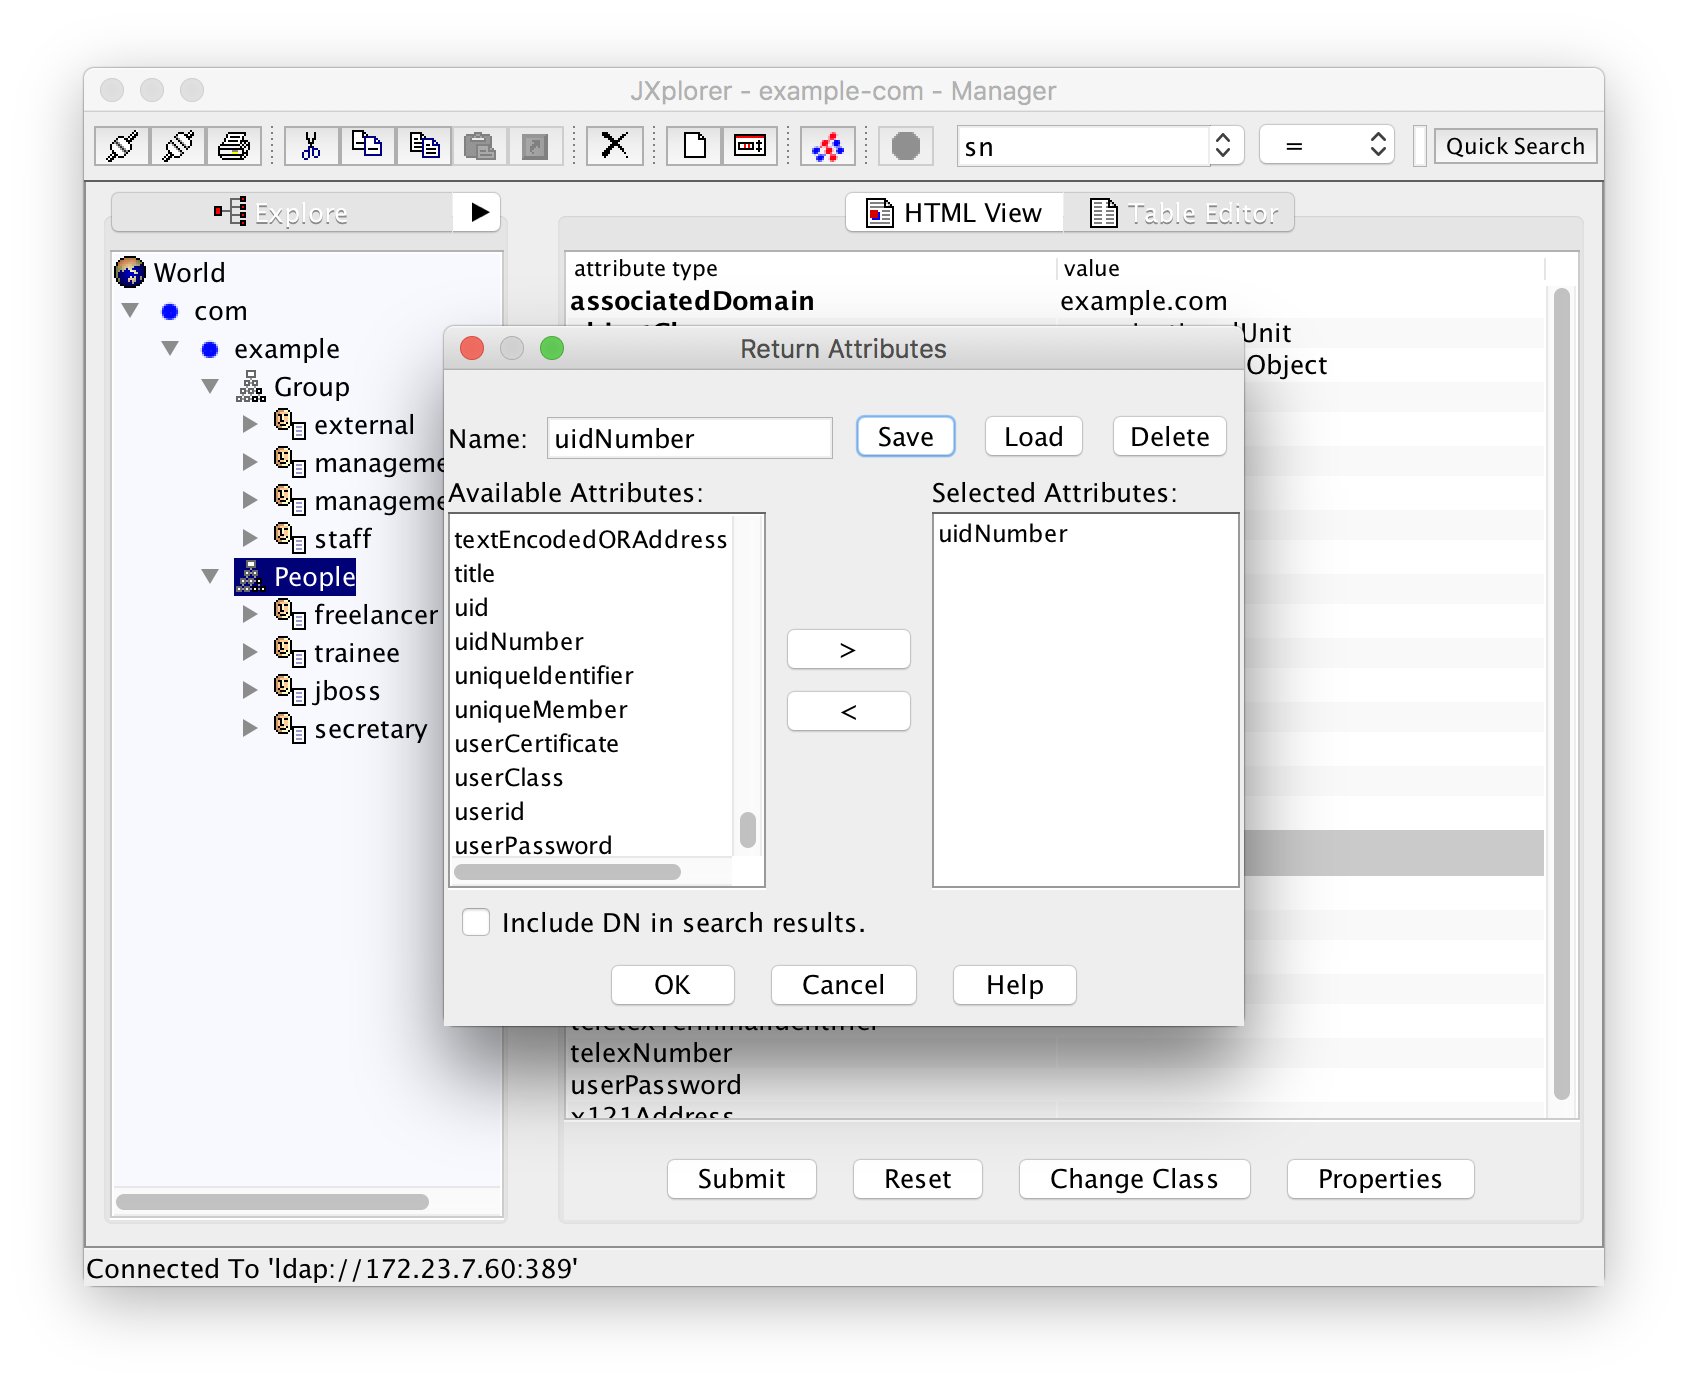
Save it as "uidNumber" or something similar.
Now that you have that attribute list, create a filter from the menu entry Search -> Search Dialog:
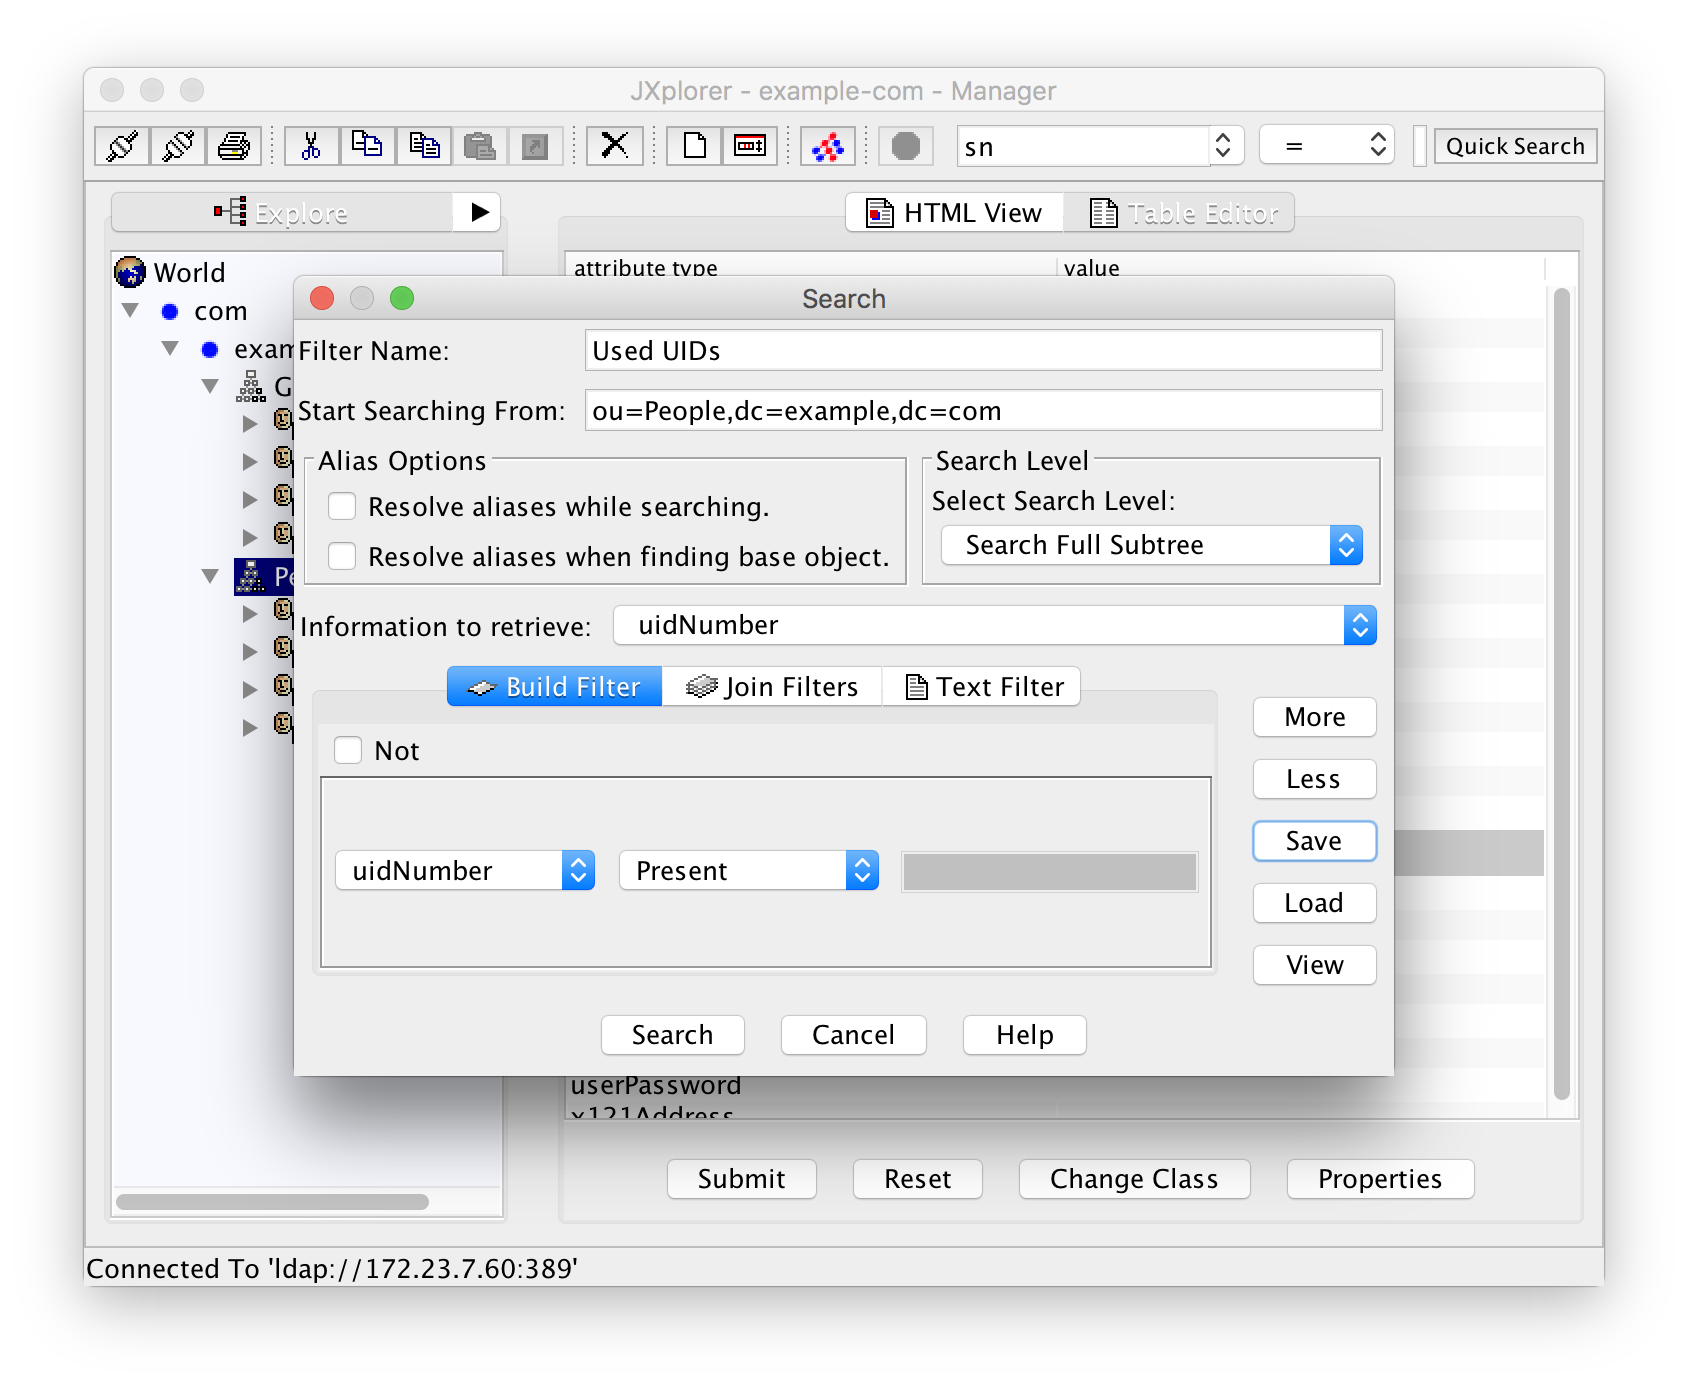
Start searching from "ou=People,dc=example,dc=com". As "Information to retrieve" select the return attribute list you have just created. In the filter definition select "uidNumber" as the attribute and "Present" as the condition.
Do not hit "Search" yet! First save the filter as "Used UIDs" or something similar.
The result of the search looks like this:
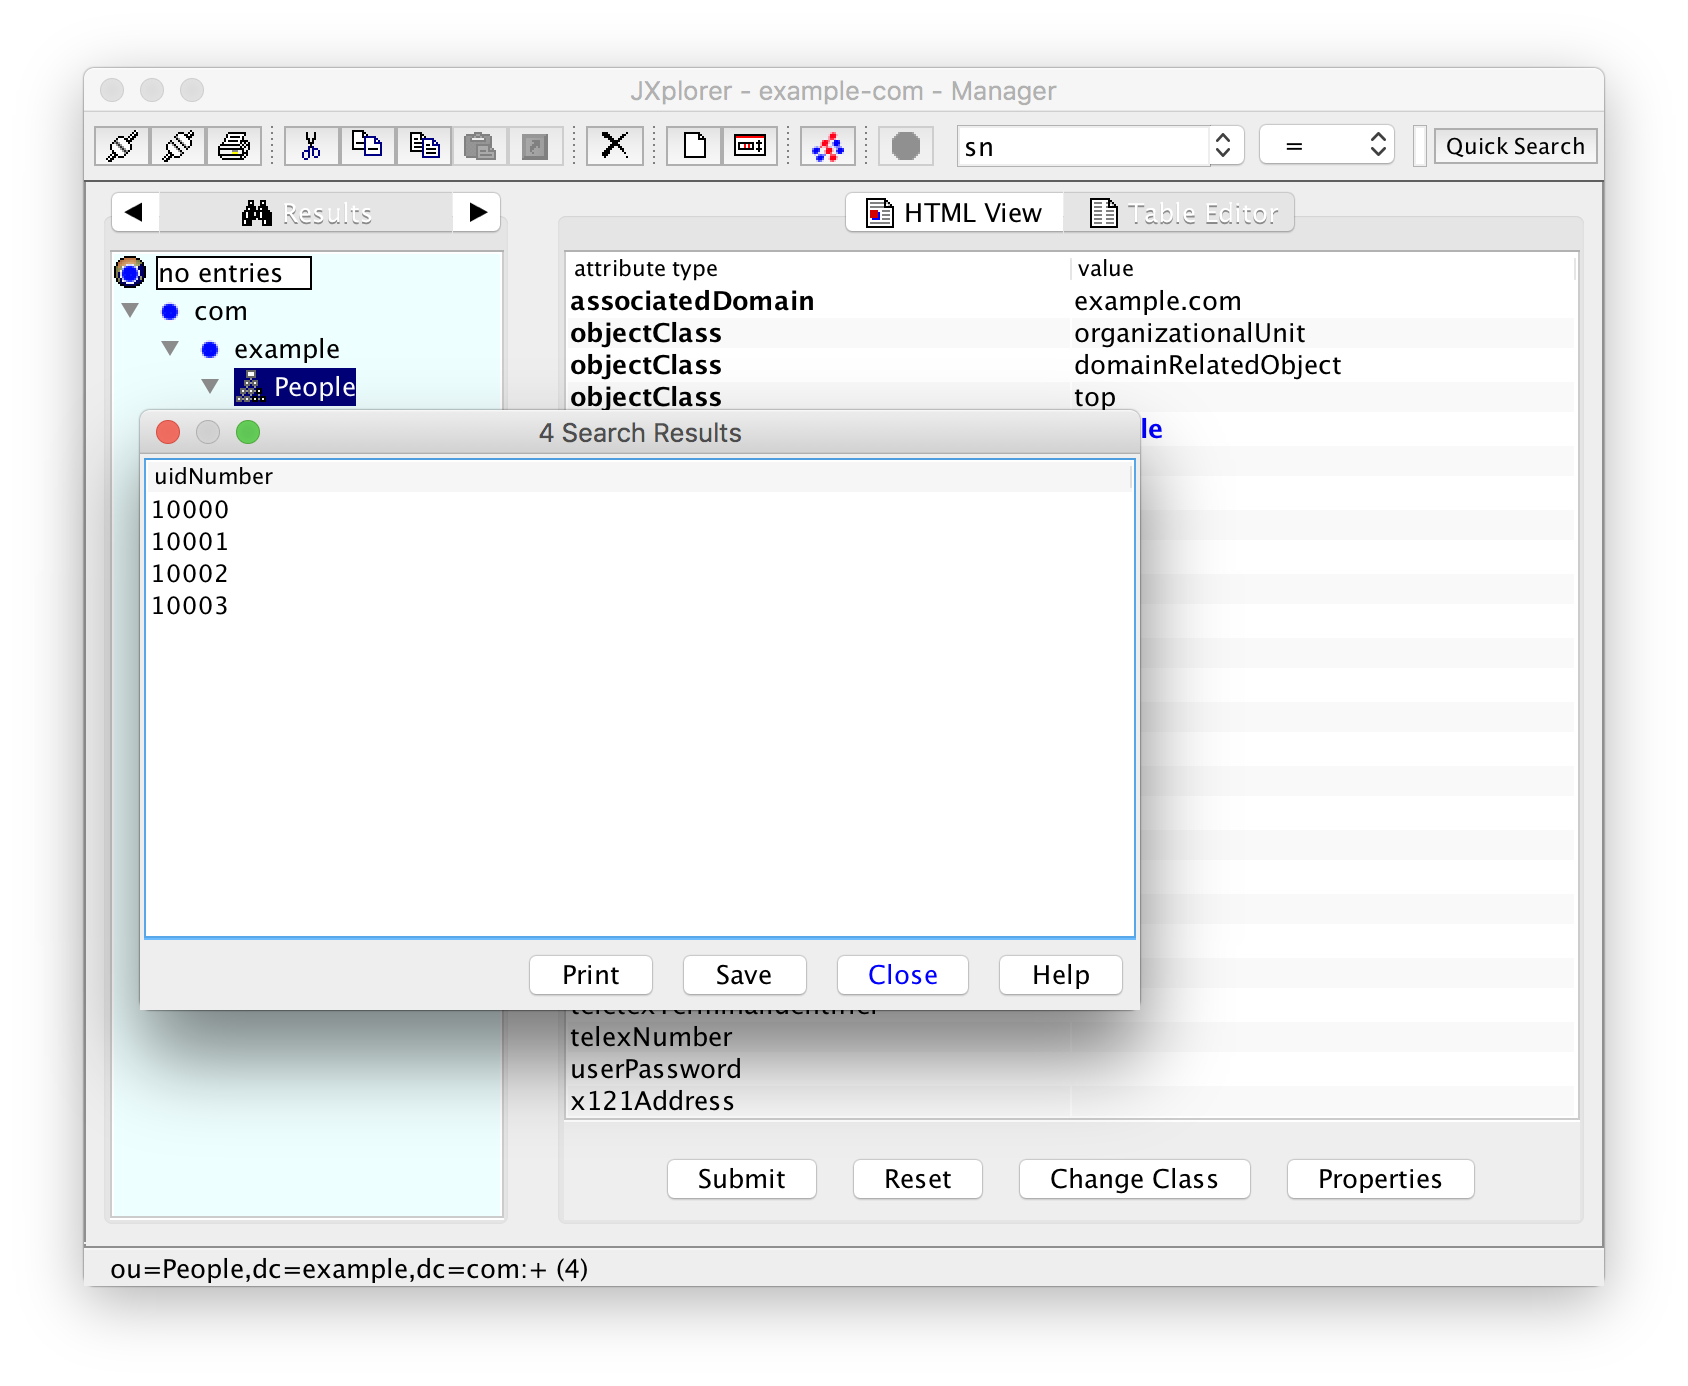
Unfortunately you cannot sort the results. They are presented in the order that you have created. Normally that will be okay if you use subsequent UID numbers. Note that the view in the left pane has now changed from "Explore" to "Results". You have to select "Explore" again in order to go back to the normal view.
Multi-Valued Fields
Ferdinand Reelancer has our mail address "freelancer@example.com" but also "ferdinand@reelancer.net". In the table view for his entry, right-click on the attribute "mail", select "Add another value", and you can enter more mail addresses.

Adding Users to Additional Groups
So far everybody has the primary group "staff" (10000) or "external" (10003). How do we assign more groups?
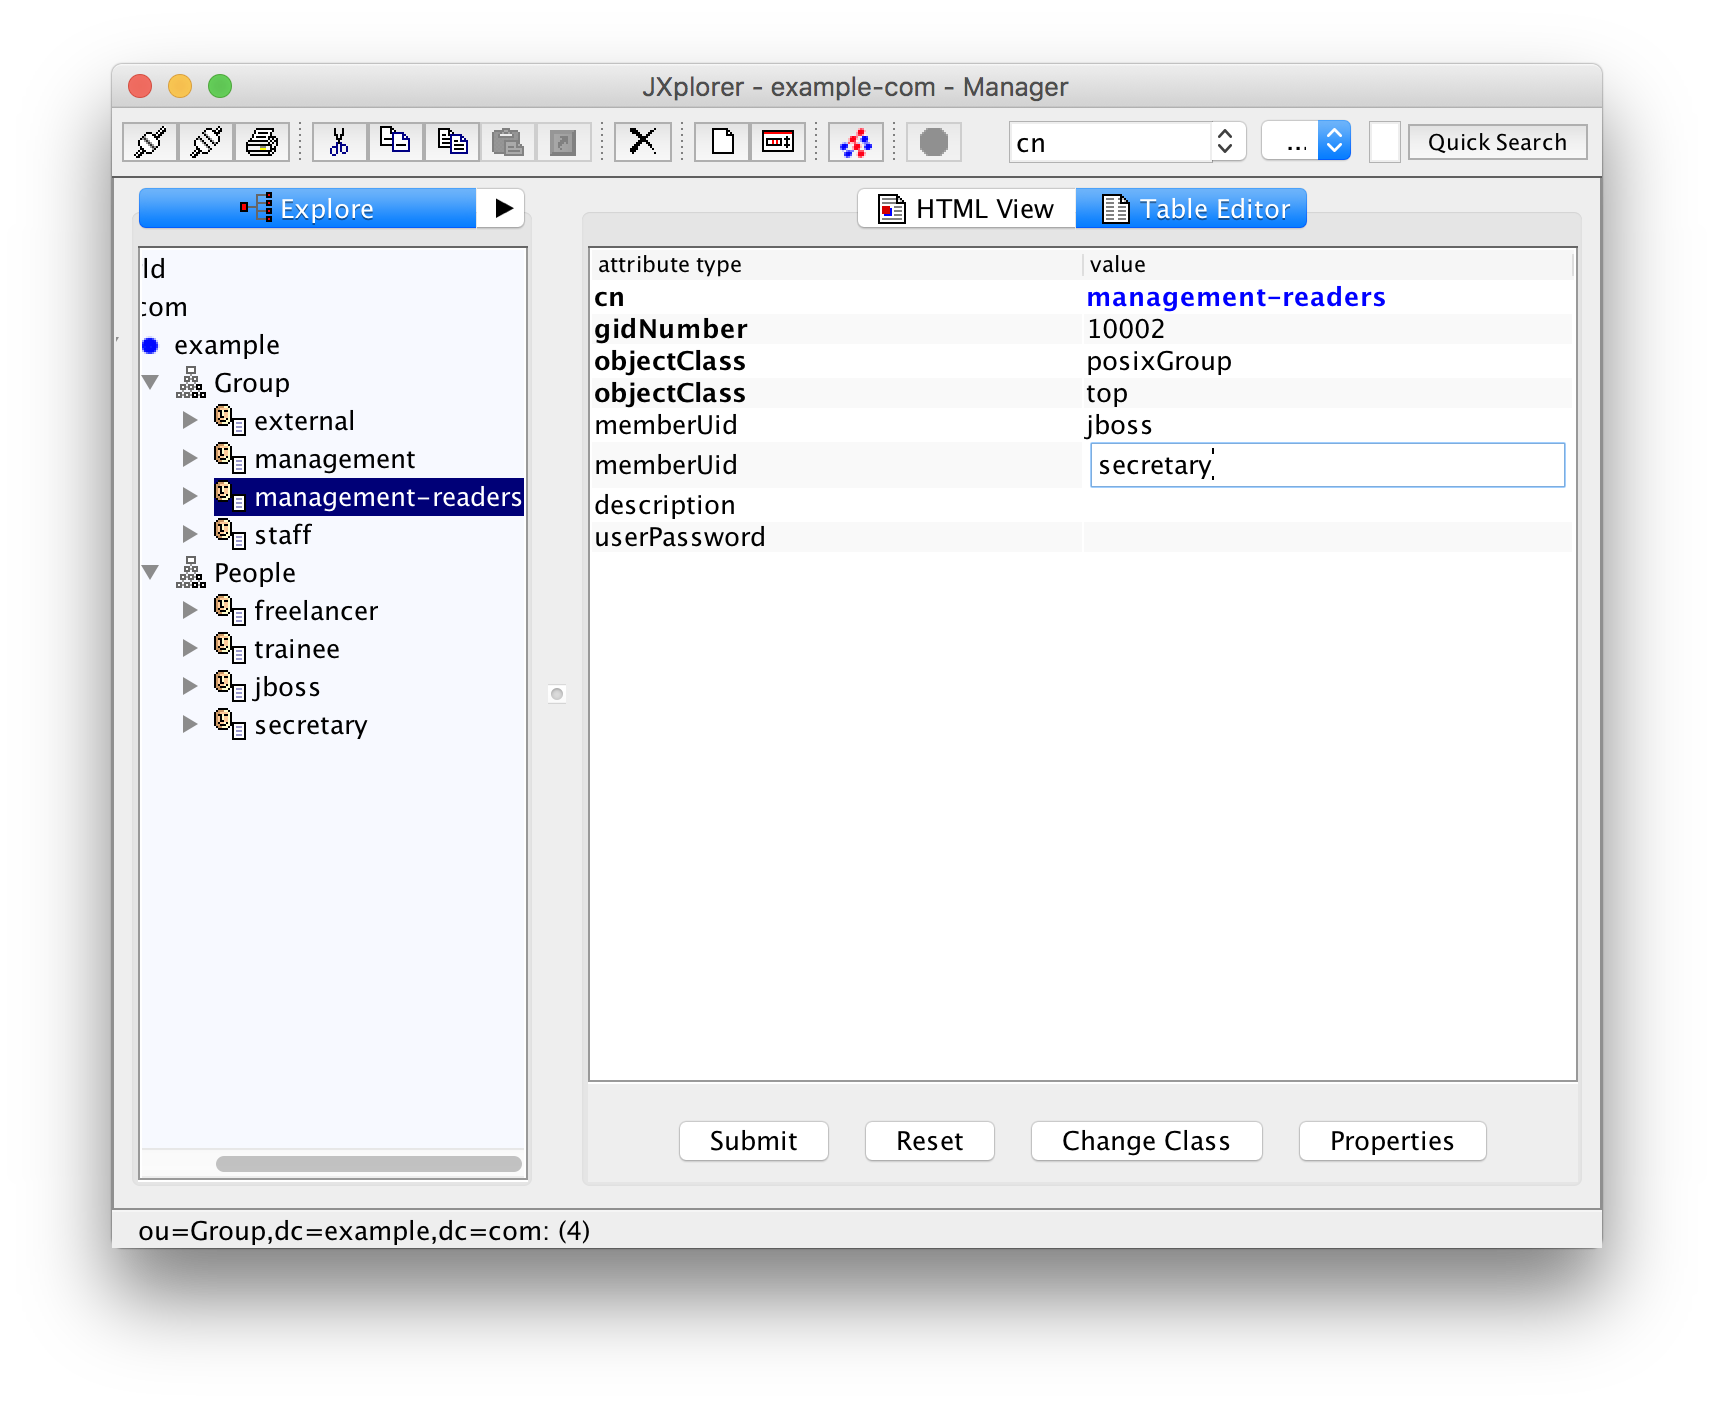
Select the entry for Susan Ecretary. Right-clicking on the attribute gidNumber lets you add another value 10002 for the group "management-readers". Saving it does however result in an error "Unable to perform Modify operation". Clicking "Details" reveals the actual error "attribute 'gidNumber' cannot have multiple values".
What you have to do instead is to select the group "management-readers", click into the cell for the value of attribute memberUid and enter her UID "secretary". Yes, "secretary", not 10002! If you are used to thinking of UIDs as numerical UIDs this is easy to forget and the LDAP server does not do any consistency check here.
Since Juliet Boss should also have read access to the management documents, you should add her memberUid as well:
Now select the group "management" and add the memberUid "jboss" so that Juliet Boss has also write access to the management documents.
You can also explicitely add users to their primary group "staff" resp. "external". But you don't have to. Later, when we configure PAM to use LDAP, we will see that this is not necessary and I would recommend against it since it is redundant.
LDAP Permissions Revisited
For the commands for listing the UIDs and GIDs in use we didn't have to enter a password. By default everybody has read-only access to the data in the directory --- just as to the files /etc/passwd --- only that this access is now possible even over the network.
That means that you should, of course, not expose the LDAP service to the internet.
Depending on your organization you may also have legal problems because of privacy issues internally. In that case you either have to allow read access only to the administrative user "Manager" or you have to configure more fine-grained access rules. See the manual page slad.conf(5) for details abot this.
Where To Go From Here?
In the next part we will learn how to configure PAM so that it reads user and group data additionally from LDAP.
You can also use LDAP for DNS, for certificate management, and a lot of other stuff. For small organizations this is normally a little bit of overkill and outside the scope of these documents.
Please use the comments section for corrections or suggestions!
Leave a comment
Giving your email address is optional. But please keep in mind that you cannot get a notification about a response without a valid email address. The address will not be displayed with the comment!