
Formatting Large Hard-Disks On Mac OS X
My new LaCie rugged USB-C drive showed only a capacity of 372 MB instead of the 4 TB that I had bought, when I formatted the disk on Mac OS X High Sierra. It turned out that I first had to create a GUID Partition Table (GPT) on it to use the full capacity.
Find Out The Partition Table Type
Select About This Mac from the Apple menu in the top-left corner, click on System Report... and select USB from the Hardware section. You can now see the different USB drives attached. Selecting one in the upper-right pane shows the relevant information:
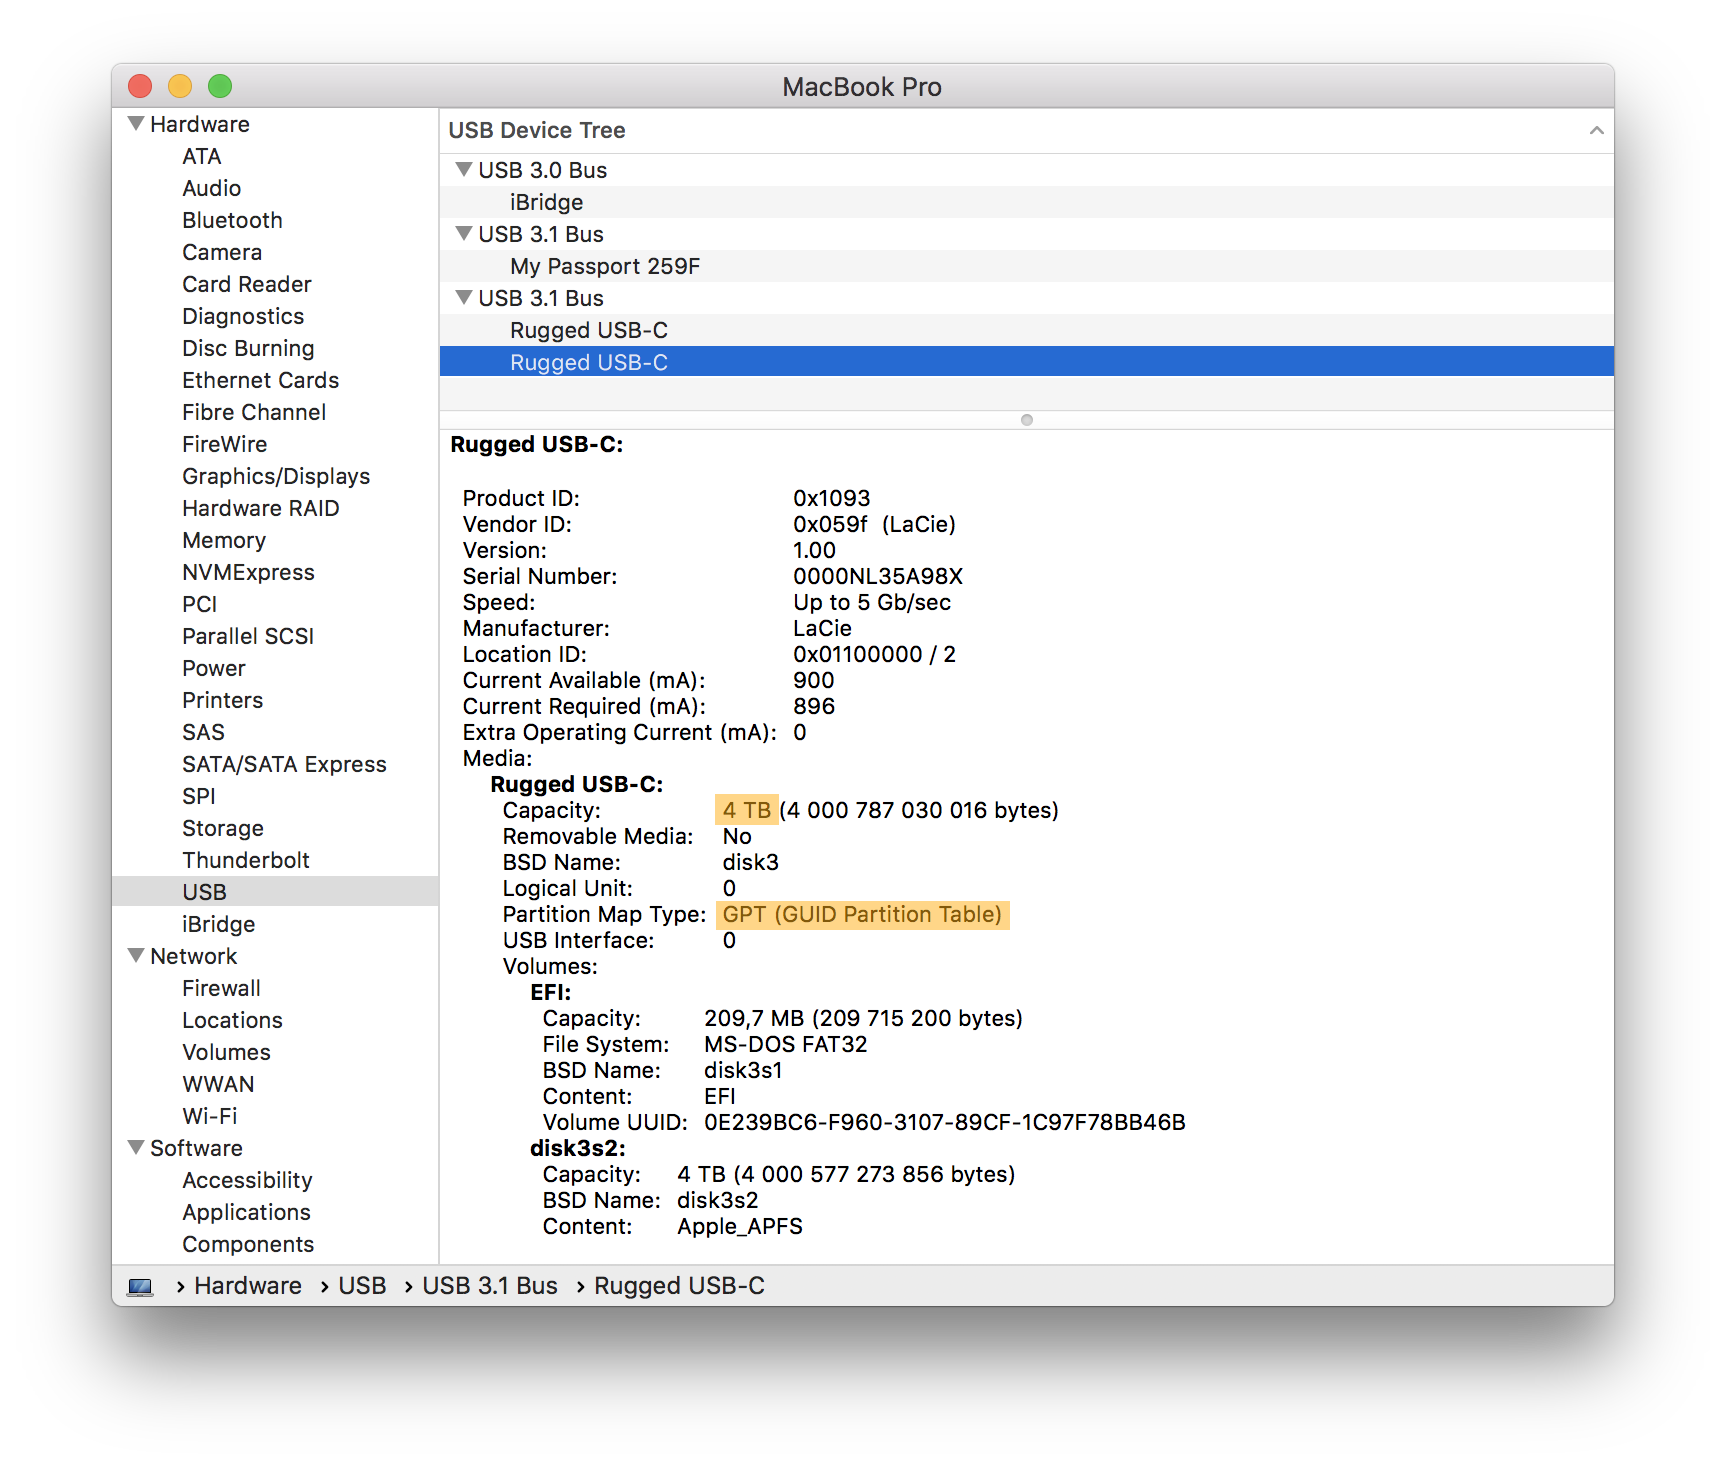 The drive displayed above is already converted. Before that it showed 374 MB capacity, and "Master Boot Record (MBR)" for the partition map type.
You can see similar information from the command-line:
$ diskutil list
/dev/disk0 (internal):
   #:                       TYPE NAME                    SIZE       IDENTIFIER
   0:      GUID_partition_scheme                         500.3 GB   disk0
   1:                        EFI EFI                     314.6 MB   disk0s1
   2:                 Apple_APFS Container disk1         500.0 GB   disk0s2

...
Look for the lines starting with 0:. They show the partition type, either GUID_partion_scheme, APFS Container Scheme, or MBR_partition_scheme.
Most USB drives, even those with only 2 TB of storage or less nowadays with a GPT but the 4 TB LaCie Samsung drives still used a Master Boot Record (MBR). Firing up disk Utility, right-clicking the drive and selecting Erase... did not help. I had to us the command-line.
Finding The Disk Identifier
Before you can proceed, you must find out the disk number or identifier. The easiest way of doing this is to run diskutil list twice. Once with the drive plugged in, once plugged out (unmount first!), so that you can see it appear and vanish in the list. It can take a couple of seconds for a disk to appear and disappear.
You should have now identified your drive as something like /dev/disk2 (external, physical). Time to create a GUID Partition Table on it with:
$ diskutil partitionDisk /dev/disk2 GPT JHFS+ YOUR-LABEL 0b
Started partitioning on disk2
Unmounting disk
Creating the partition map
Waiting for partitions to activate
Formatting disk2s2 as Mac OS Extended (Journaled) with name YOUR-LABEL
Initialized /dev/rdisk2s2 as a 4 TB case-insensitive HFS Plus volume with a 311296k journal
Mounting disk
Finished partitioning on disk2
/dev/disk2 (external, physical):
   #:                       TYPE NAME                    SIZE       IDENTIFIER
   0:      GUID_partition_scheme                        *4.0 TB     disk2
   1:                        EFI EFI                     209.7 MB   disk2s1
   2:                  Apple_HFS YOUR-LABEL              4.0 TB     disk2s2
The command diskutil has many sub-commands ("verbs"), and partitionDisk is one of them. The next arguments are:
/dev/disk2: The device name of the disk that you have found out before.GPT: The partition table format.JHFS+: The file system type, in this case "Mac OS Extended".YOUR-LABEL: The label of the disk that is shown in Finder.0b: The size of the partion.0bmeans zero bytes which stands for "use everything".
Specifying diskutil partitionDisk without any argument prints help for the command.
If you are using Mac OS X High Sierra or better, you may want to try out the new APFS (Apple File System) instead of Mac OS Journaled file system. Try out whether it is available:
$ diskutil listFilesystems
Formattable file systems

These file system personalities can be used for erasing and partitioning.
When specifying a personality as a parameter to a verb, case is not considered.
Certain common aliases (also case-insensitive) are listed below as well.

-------------------------------------------------------------------------------
PERSONALITY                     USER VISIBLE NAME
-------------------------------------------------------------------------------
APFS                            APFS
  (or) APFSI
Case-sensitive APFS             APFS (Case-sensitive)
ExFAT                           ExFAT
Free Space                      Free Space
  (or) FREE
MS-DOS                          MS-DOS (FAT)
MS-DOS FAT12                    MS-DOS (FAT12)
MS-DOS FAT16                    MS-DOS (FAT16)
MS-DOS FAT32                    MS-DOS (FAT32)
  (or) FAT32
HFS+                            Mac OS Extended
Case-sensitive HFS+             Mac OS Extended (Case-sensitive)
  (or) HFSX
Case-sensitive Journaled HFS+   Mac OS Extended (Case-sensitive, Journaled)
  (or) JHFSX
Journaled HFS+                  Mac OS Extended (Journaled)
  (or) JHFS+
The first entry is for "APFS" which means it is available. If you choose to replace "JHFS+" with "APFS", you will see that diskutil list now shows two drives. One "external, physical" drive, and another "synthesized" drive.
You also see options for case-sensitive versions of the file systems. Choose them only, when you know what you are doing because a lot of software for Mac OS has problems with case-sensitive file systems.
If you want to be able to use the disk with other operating systems, you should pick FAT32.
Note that you have to use double quotes around file system types that contain a space. You have to use "MS-DOS FAT32" and not just MS-DOS FAT32.
Leave a comment
Giving your email address is optional. But please keep in mind that you cannot get a notification about a response without a valid email address. The address will not be displayed with the comment!